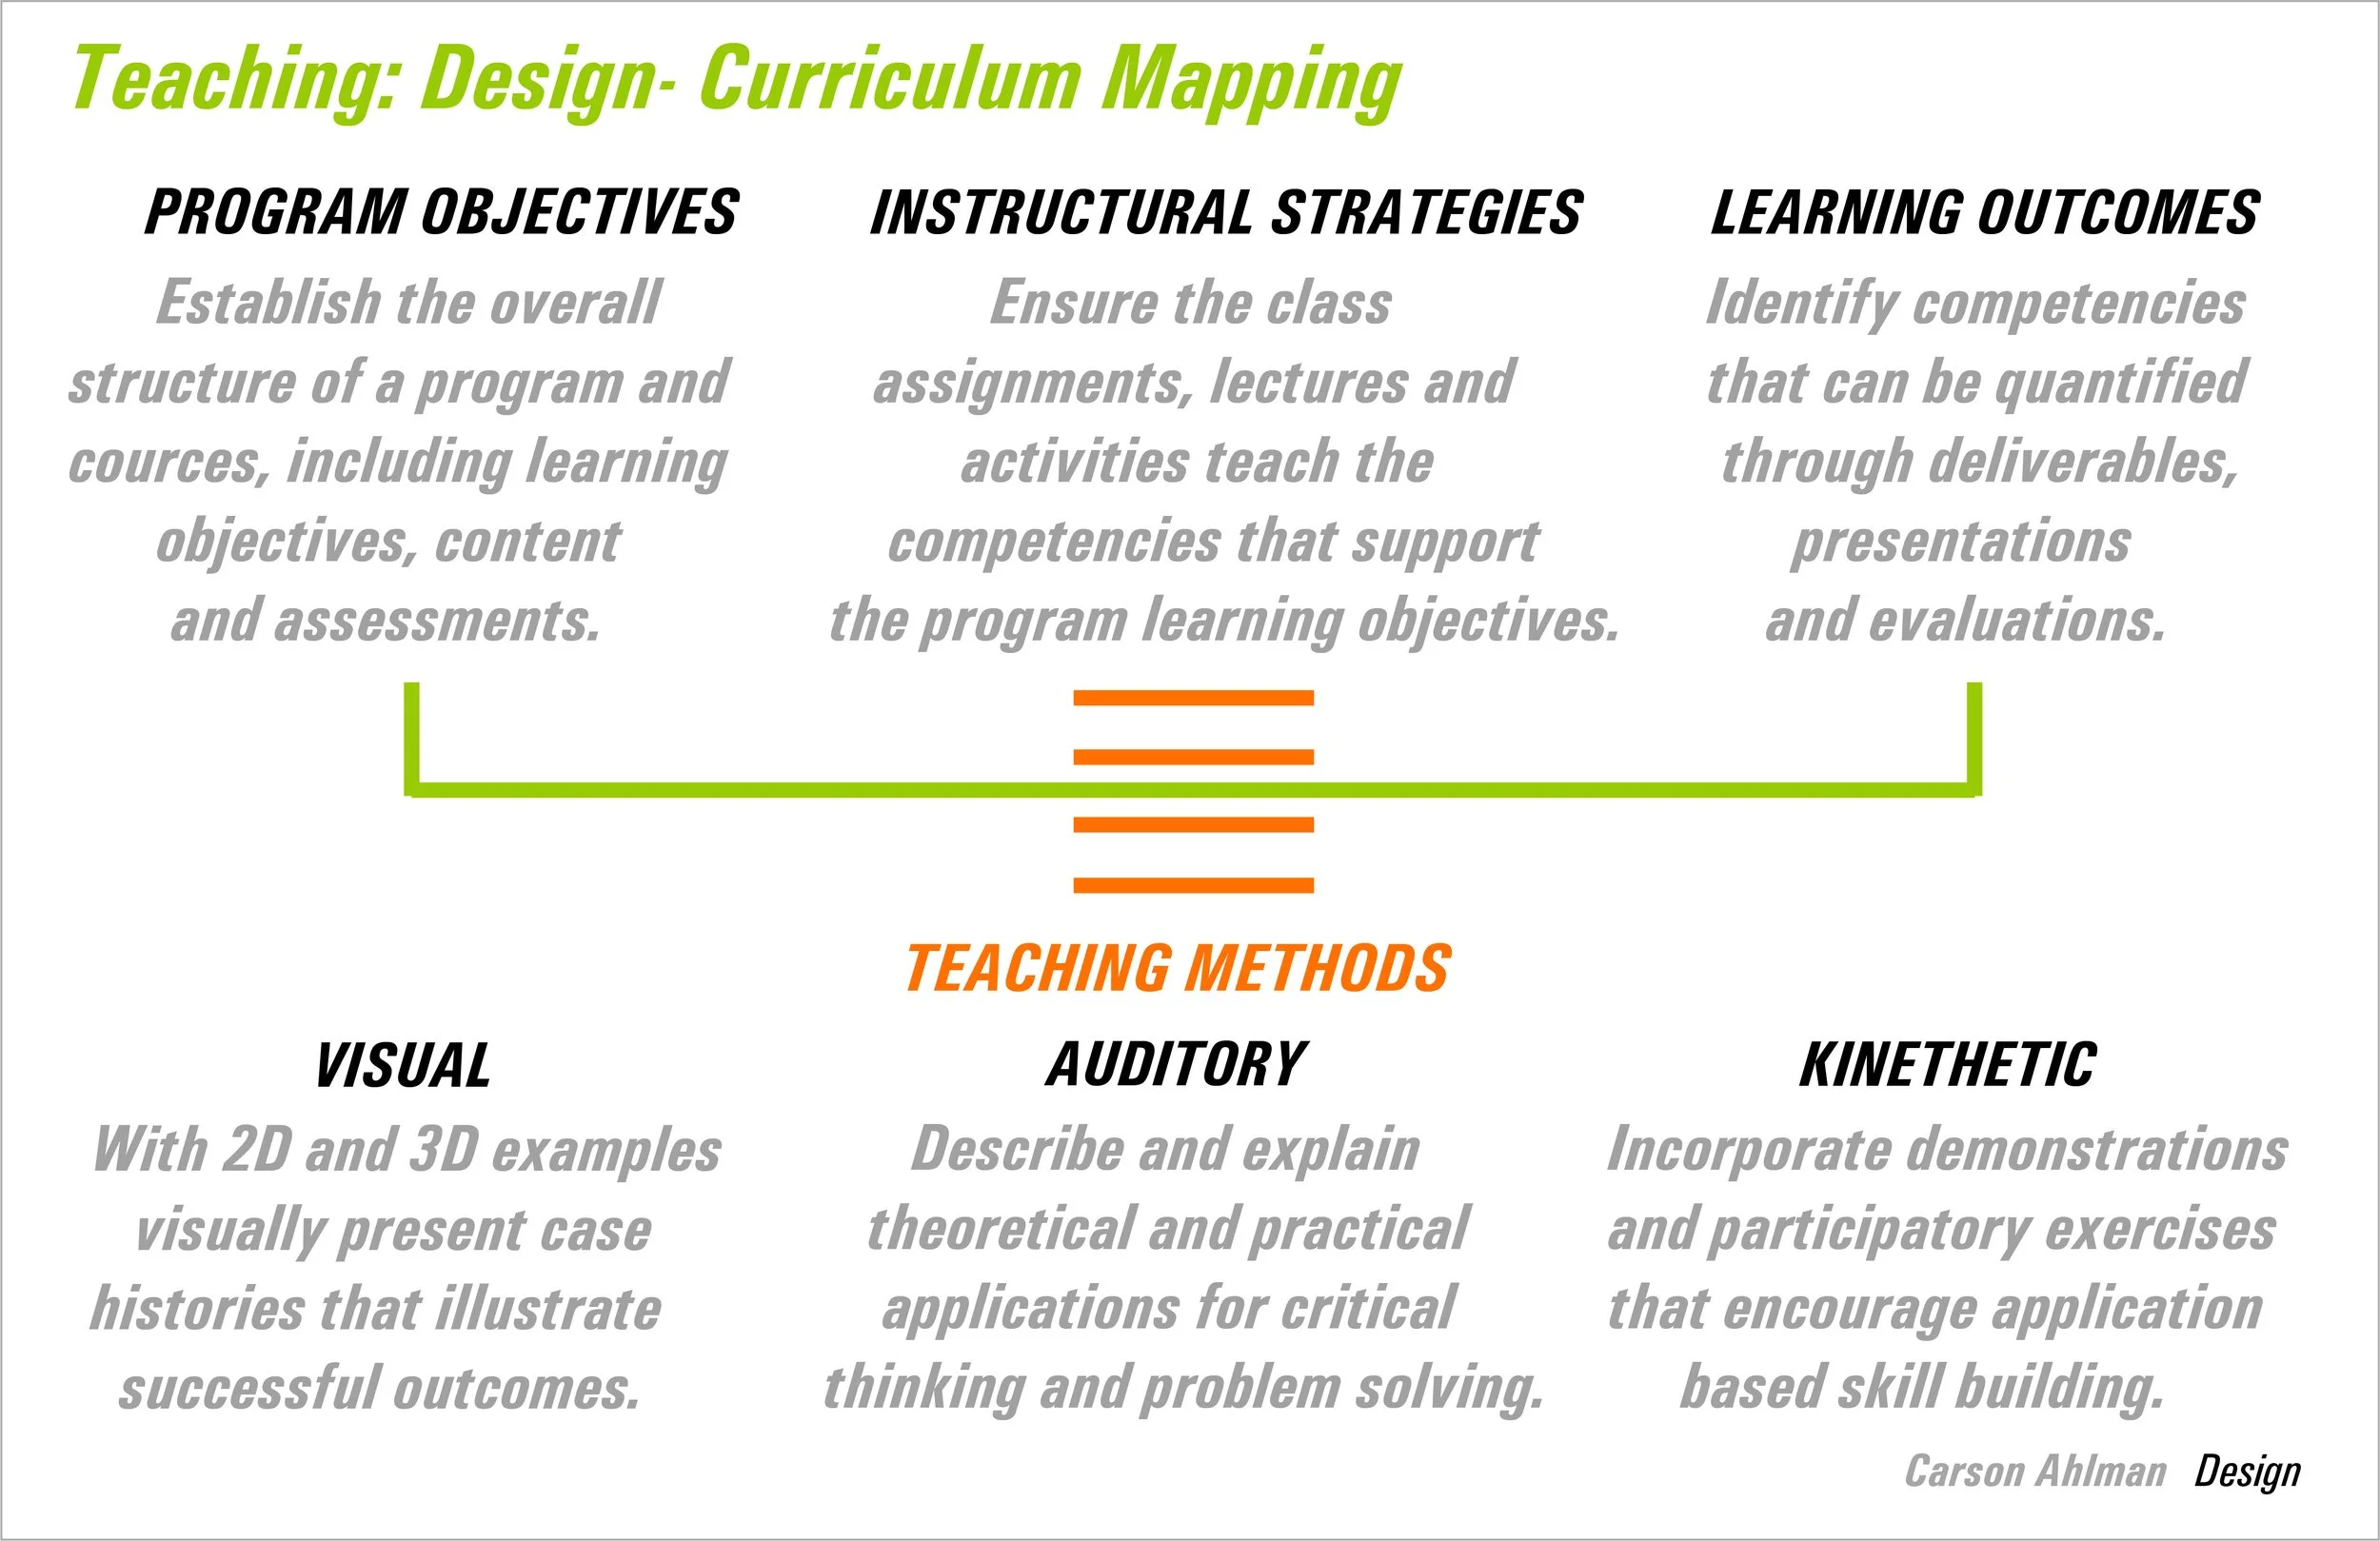
In my approach to teaching design, I emphasize a holistic process that balances conceptual thinking with hands-on practice. My process is rooted in design theory, giving students a critical foundation in visual language, user-centered design, and the cultural, historical, and ethical contexts of design practice. This theoretical grounding supports informed decision-making throughout the creative process.
The following activities are integrated into the lessons:
Iteration
Sketching
3D modeling
Mock-up fabrication
Brand integration
Sustainability
Together, these components cultivate designers who are conceptually rigorous, technically proficient, and mindful of the broader impact of their work.
Teaching design through historical references involves framing the subject within the context of influential movements and pioneering leaders. Here's my structured approach:
Introduce Major Design Movements:
Highlight Innovative Design Leaders:
Use Case Studies and Visuals:
Connect Historical Insights to Contemporary Design:
Engage in Comparative Analysis:
Practical Application:
By weaving narratives about design history and innovation into my teaching, students gain a richer understanding of design's evolution and develop their ability to innovate thoughtfully, grounded in a historical context.
Teaching design through visual storytelling techniques involves guiding students to communicate ideas effectively by crafting compelling images, mock-ups, and reference materials. Here's my approach to structure this method:
Emphasize Narrative as a Foundation:
Create Visual Assets and Mock-ups:
Incorporate Reference Materials:
Guide Through Visual Composition and Communication:
Use Iterative Feedback and Refinement:
Presenting the Visual Story:
Inspire Creative Experimentation:
By integrating these techniques, students learn to craft visual narratives that communicate ideas powerfully and convincingly, using images, mock-ups, and references to tell stories that engage and influence audiences.
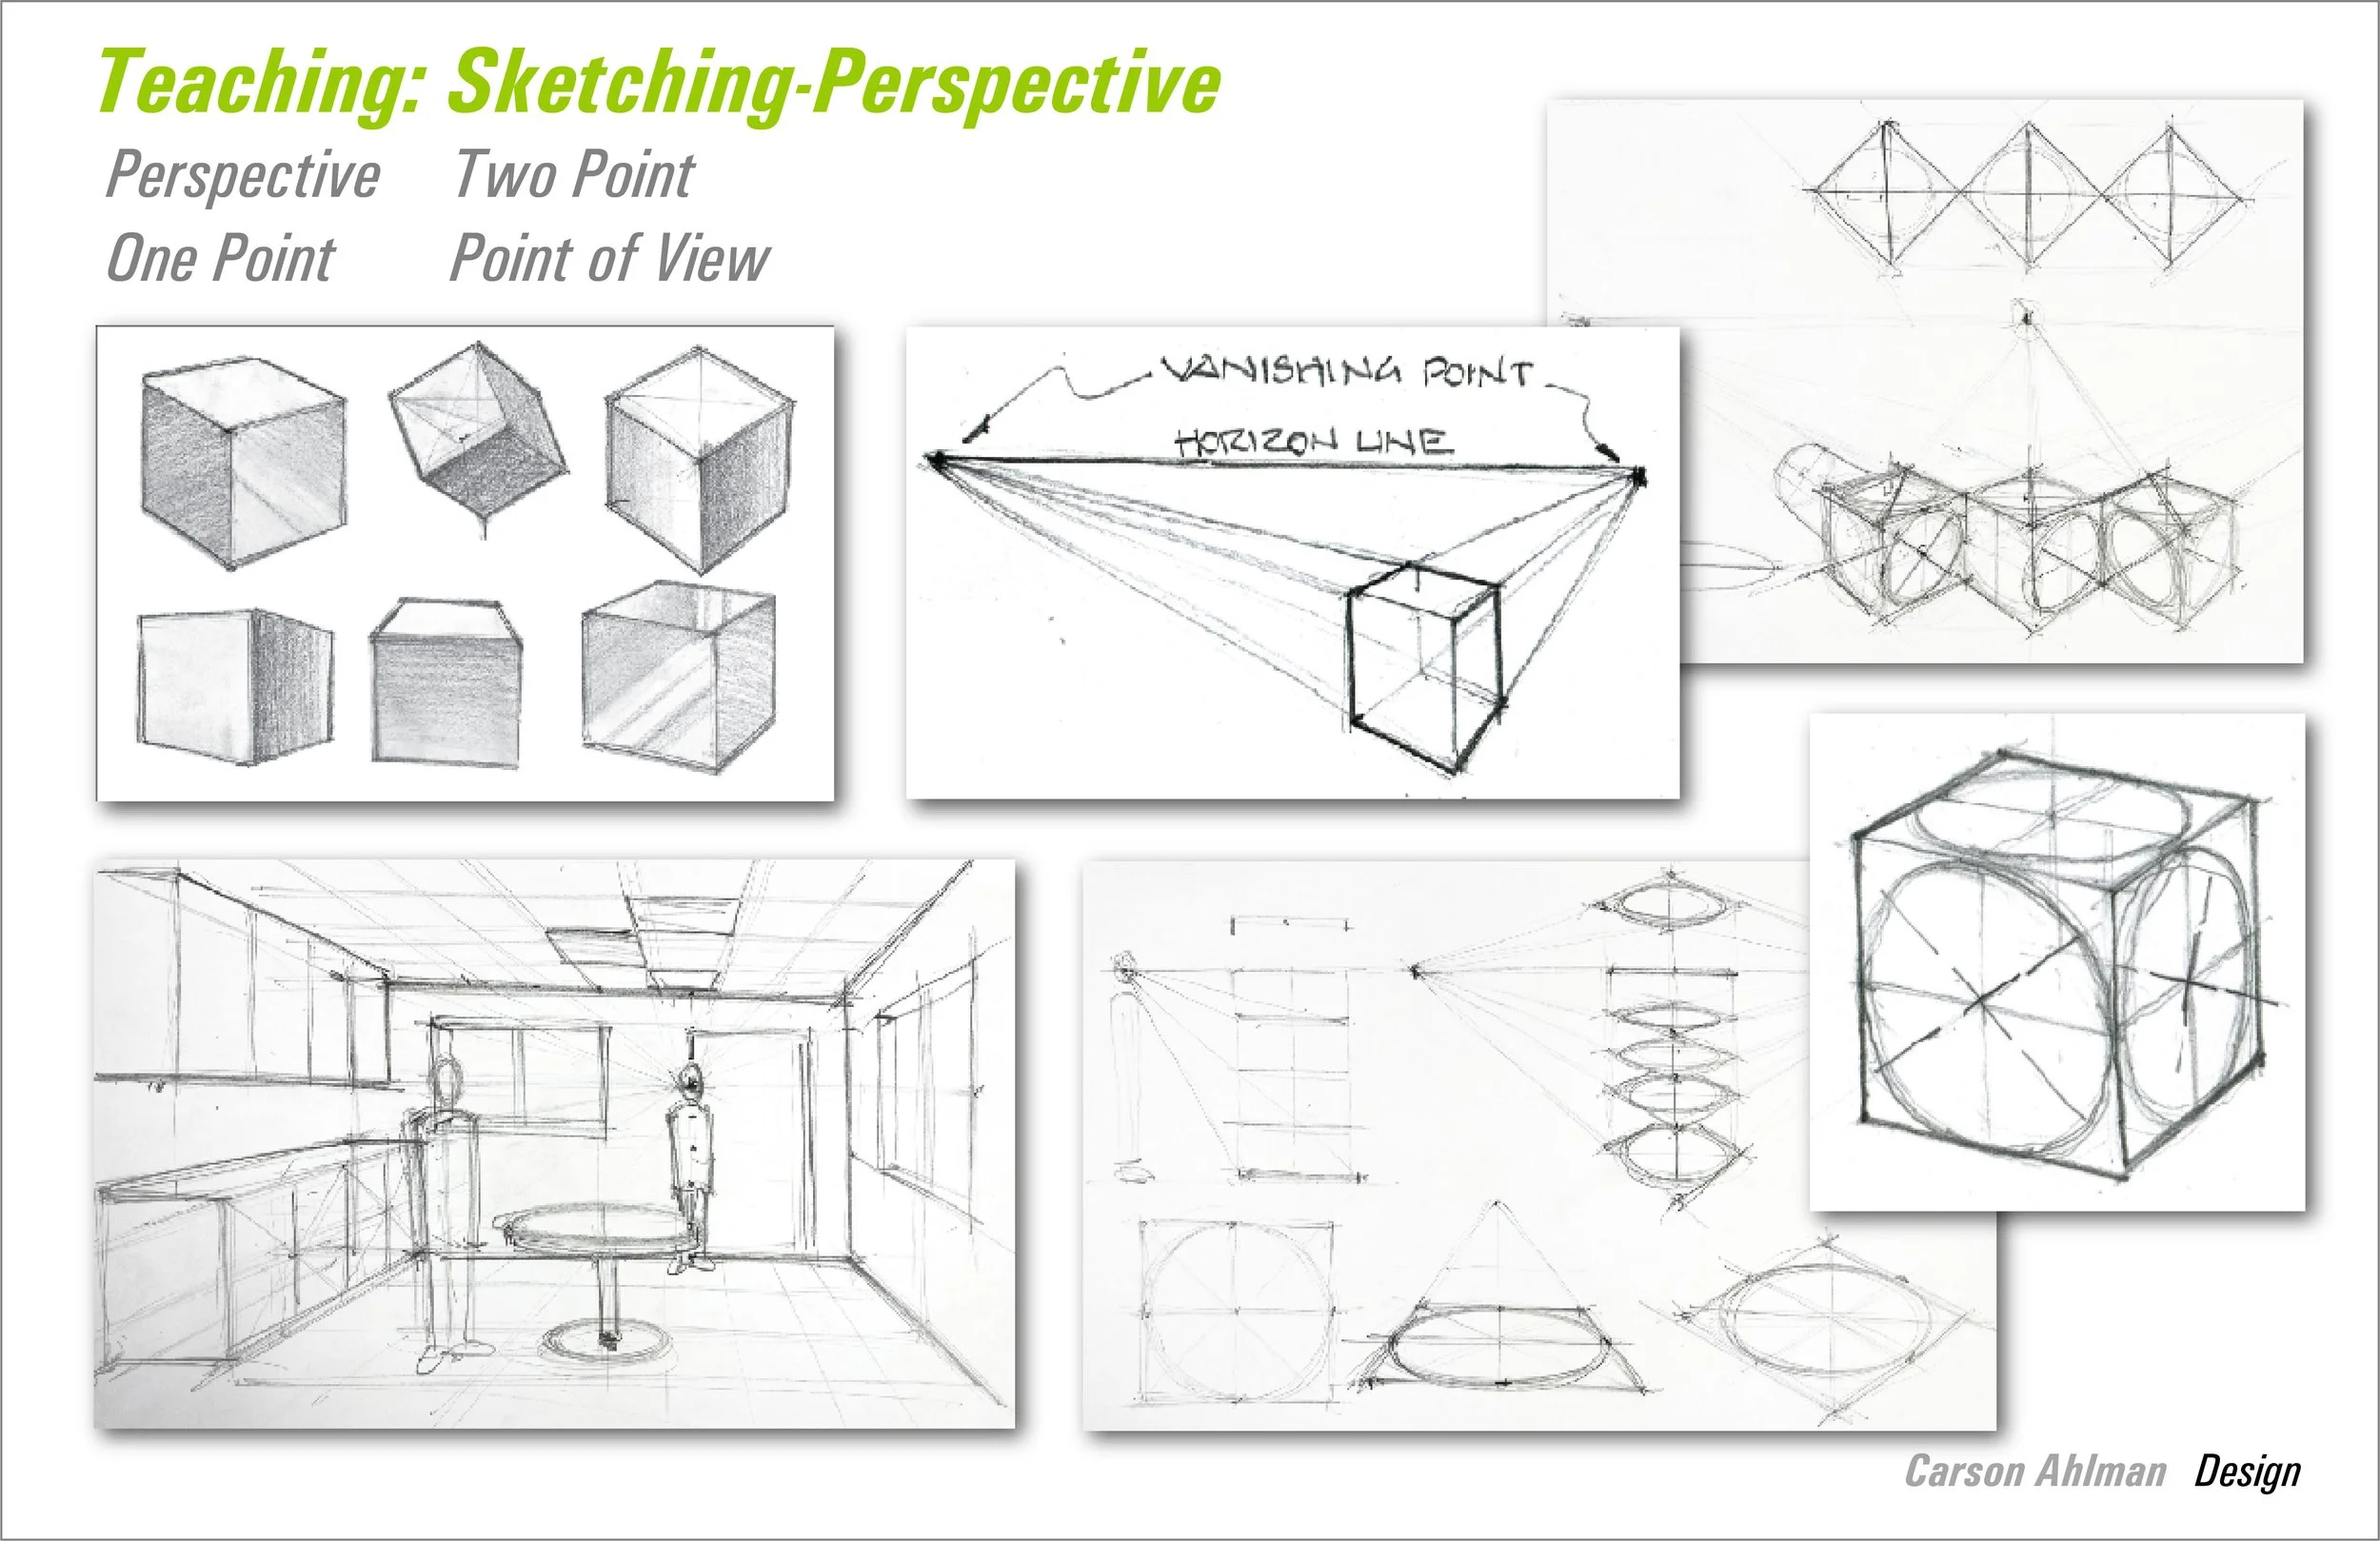
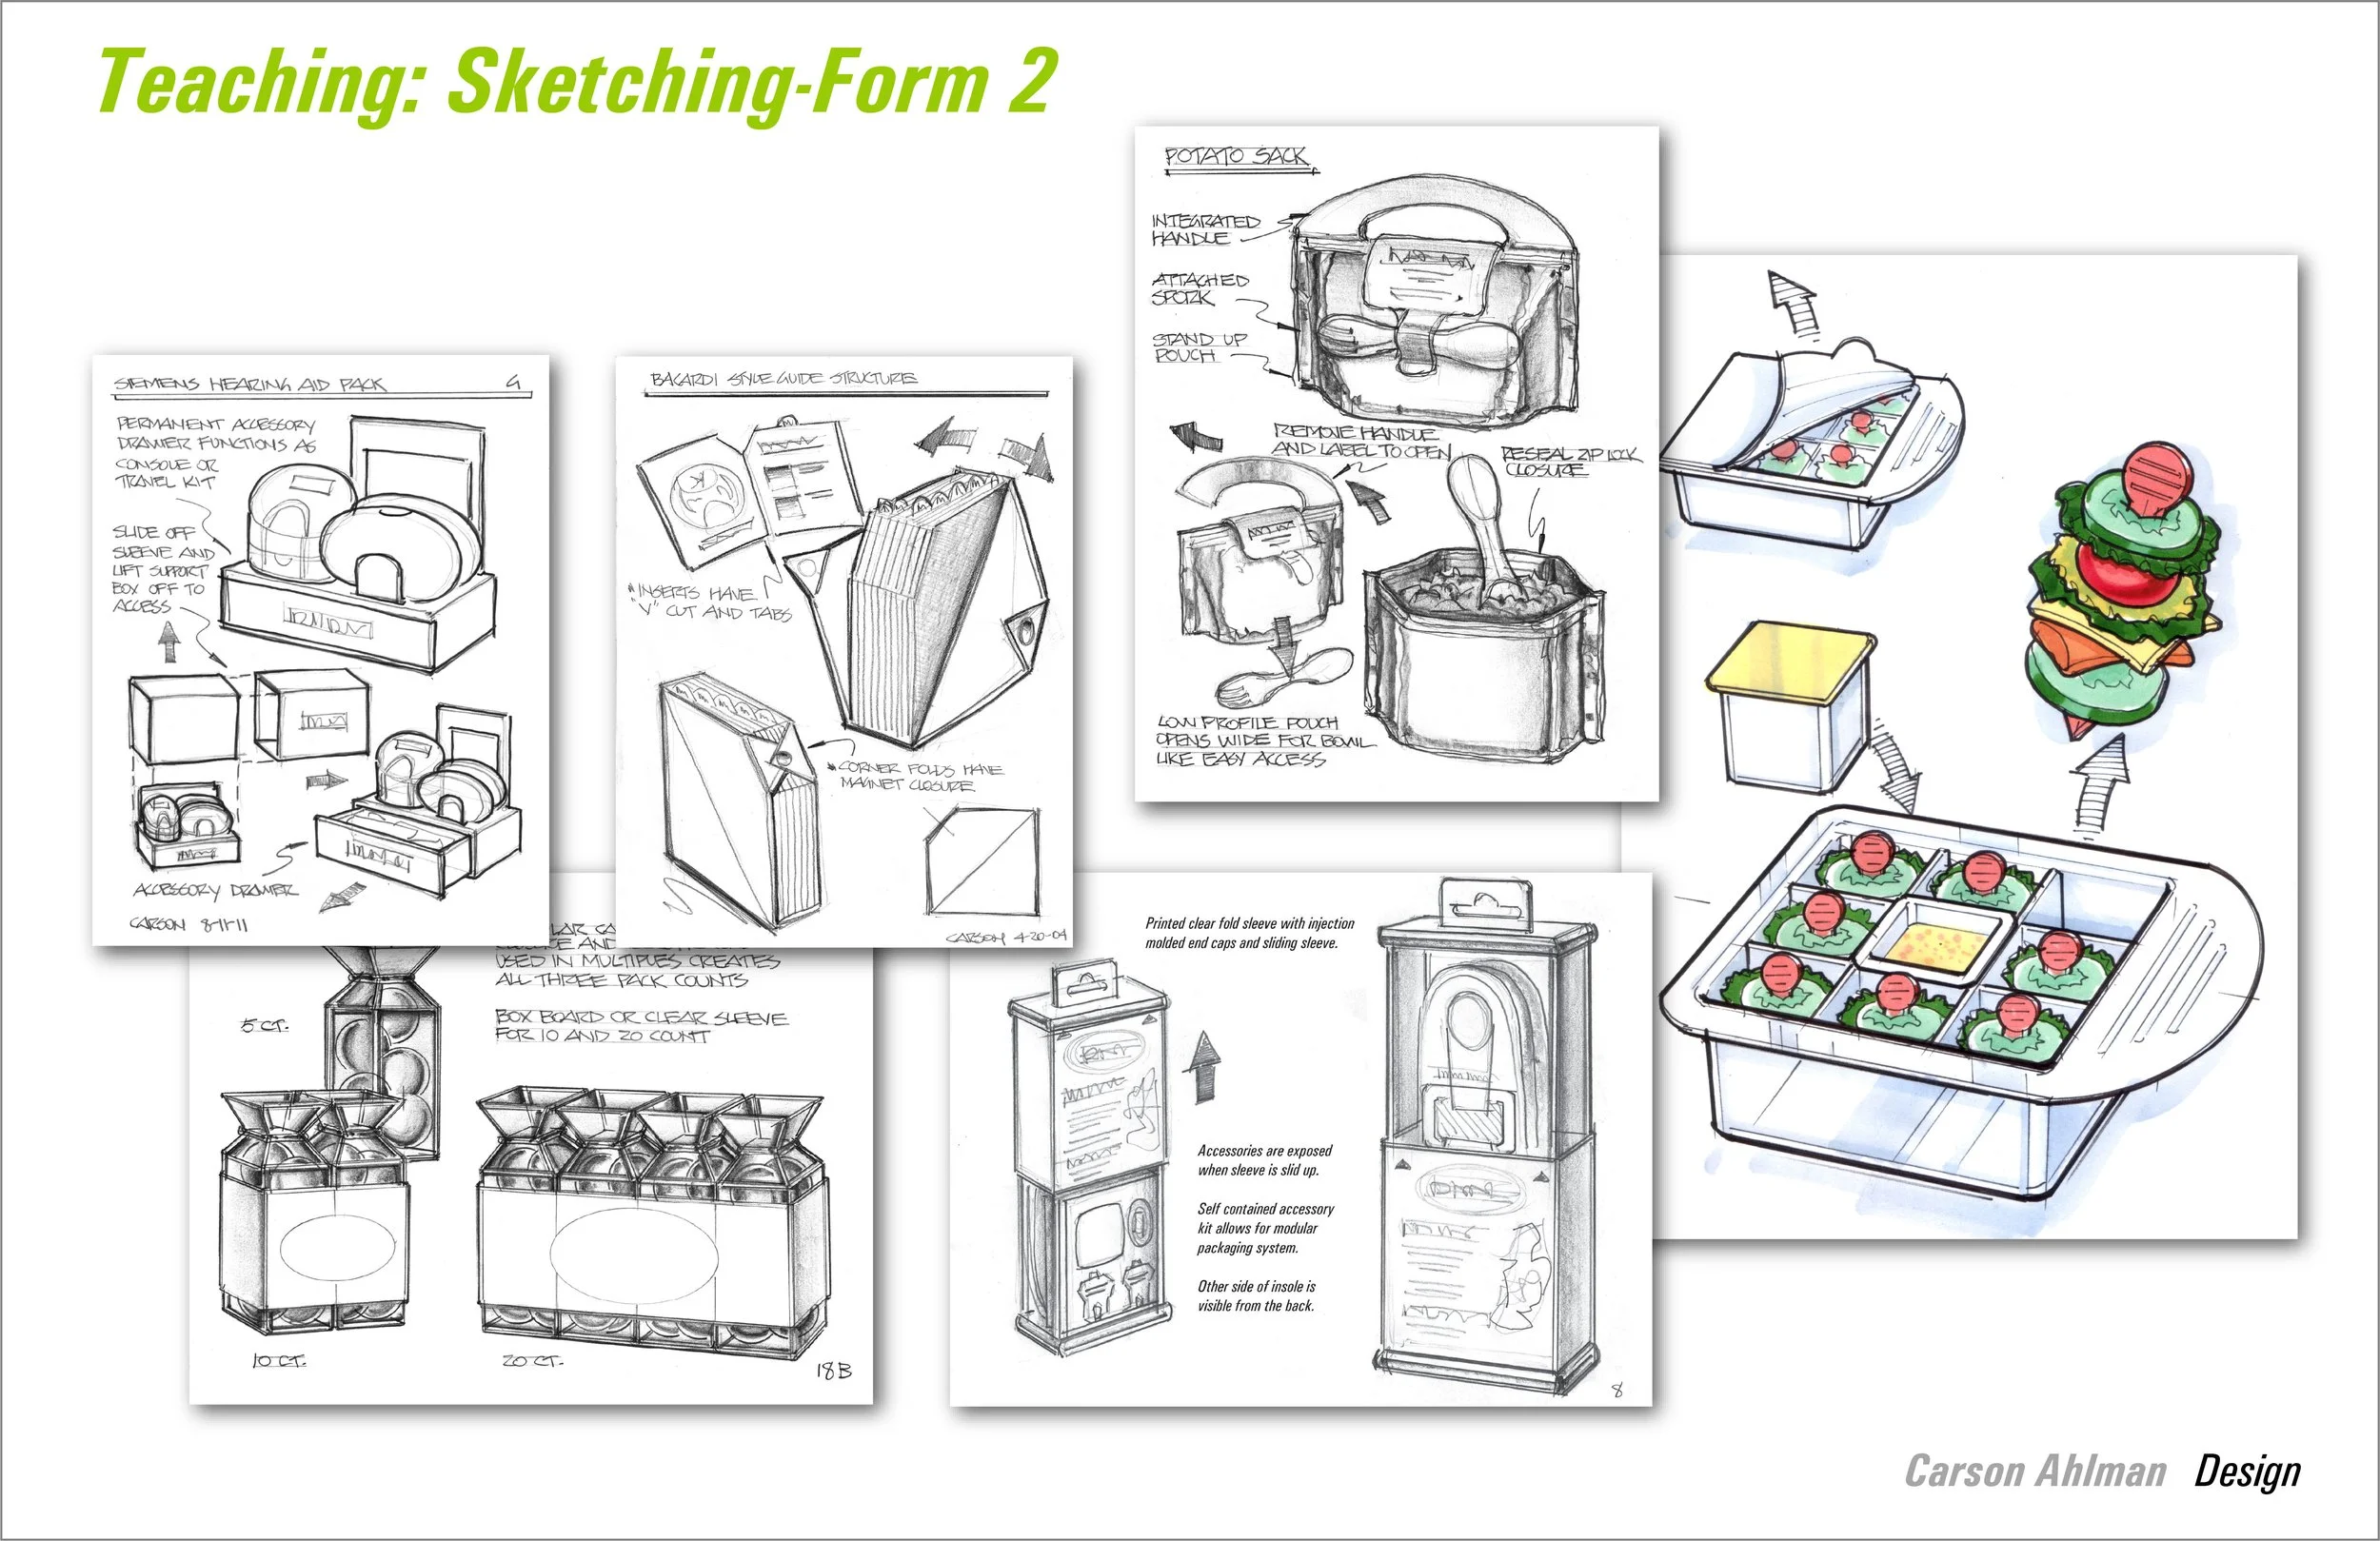
How I Teach Sketching as an Essential Part of the Design Process
I teach sketching not just as a drawing skill, but as a critical thinking tool central to the design process. My approach emphasizes sketching as a fast, flexible, and intuitive method for exploring ideas, solving problems, and communicating concepts.
From the beginning, I encourage students to use sketching as a way to externalize their thinking. We treat the sketchbook as a lab—not a portfolio—where quantity, spontaneity, and iteration are more important than polished outcomes. I introduce warm-up exercises to loosen creative inhibitions, then guide students through structured activities that connect sketching directly to stages of the design process: research, ideation, prototyping, and presentation.
We use sketching to:
Explore ideas quickly
Refine concepts
Test feasibility
Communicate clearly
I also integrate critiques and collaborative sketching sessions to build confidence and emphasize clarity over perfection. Ultimately, students learn that sketching is a powerful, lifelong skill for every designer—an essential mode of inquiry, exploration, and expression.
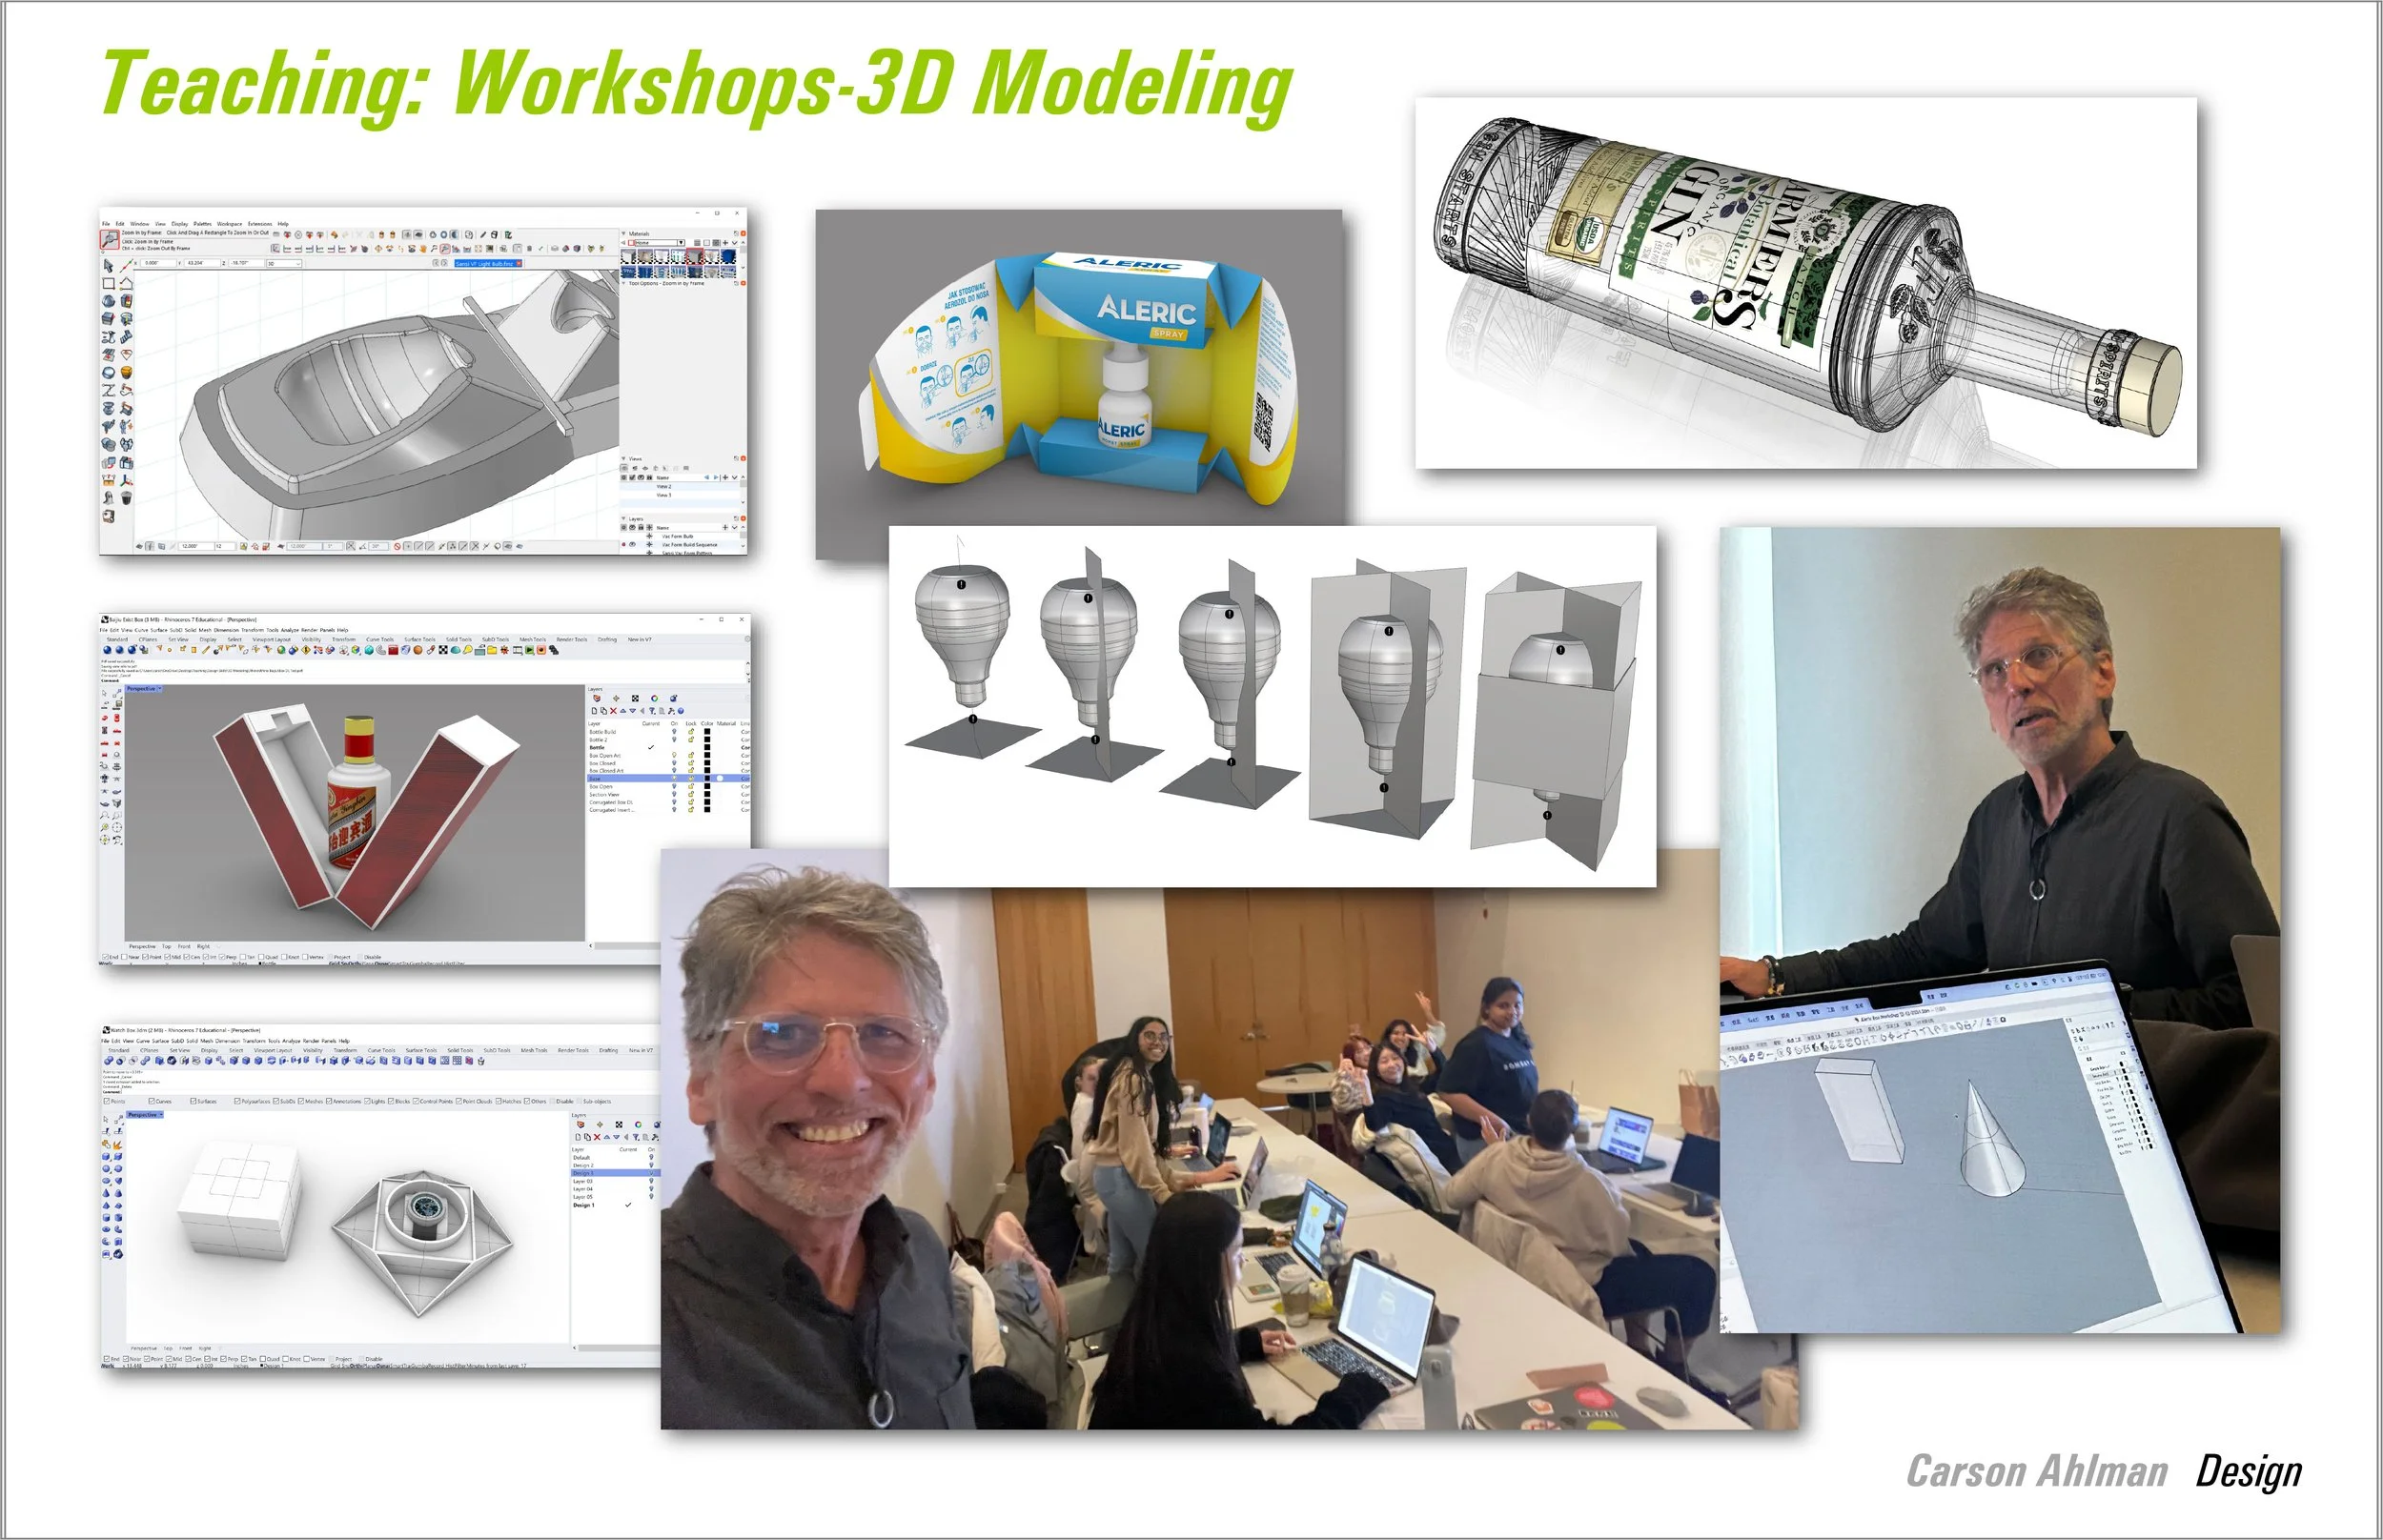
In my teaching approach, I guide students through the creative and iterative process of design using 3D modeling tools. This methodology enables students to visualize, manipulate, and refine their ideas in a digital space before realization.
Key Aspects of the Process:
1. Exploration and Conceptualization
Students start by sketching initial concepts, then translate these ideas into 3D models using both polynomial (polygonal meshes) and parametric modeling techniques. This allows for rapid prototyping and testing design concepts from multiple angles.
2. Iterative Development
The 3D environment encourages experimentation with form, proportion, and detail. Students learn to modify their models dynamically, fostering a deeper understanding of spatial relationships and material considerations.
3. Digital Fabrication Preparation
Models are exported in suitable formats—polynomial formats like STL or OBJ for 3D printing, and parametric formats (such as STEP or IGES) for CNC or laser cutting. These files serve as precise instructions for digital fabrication processes.
4. Rendering and Visualization
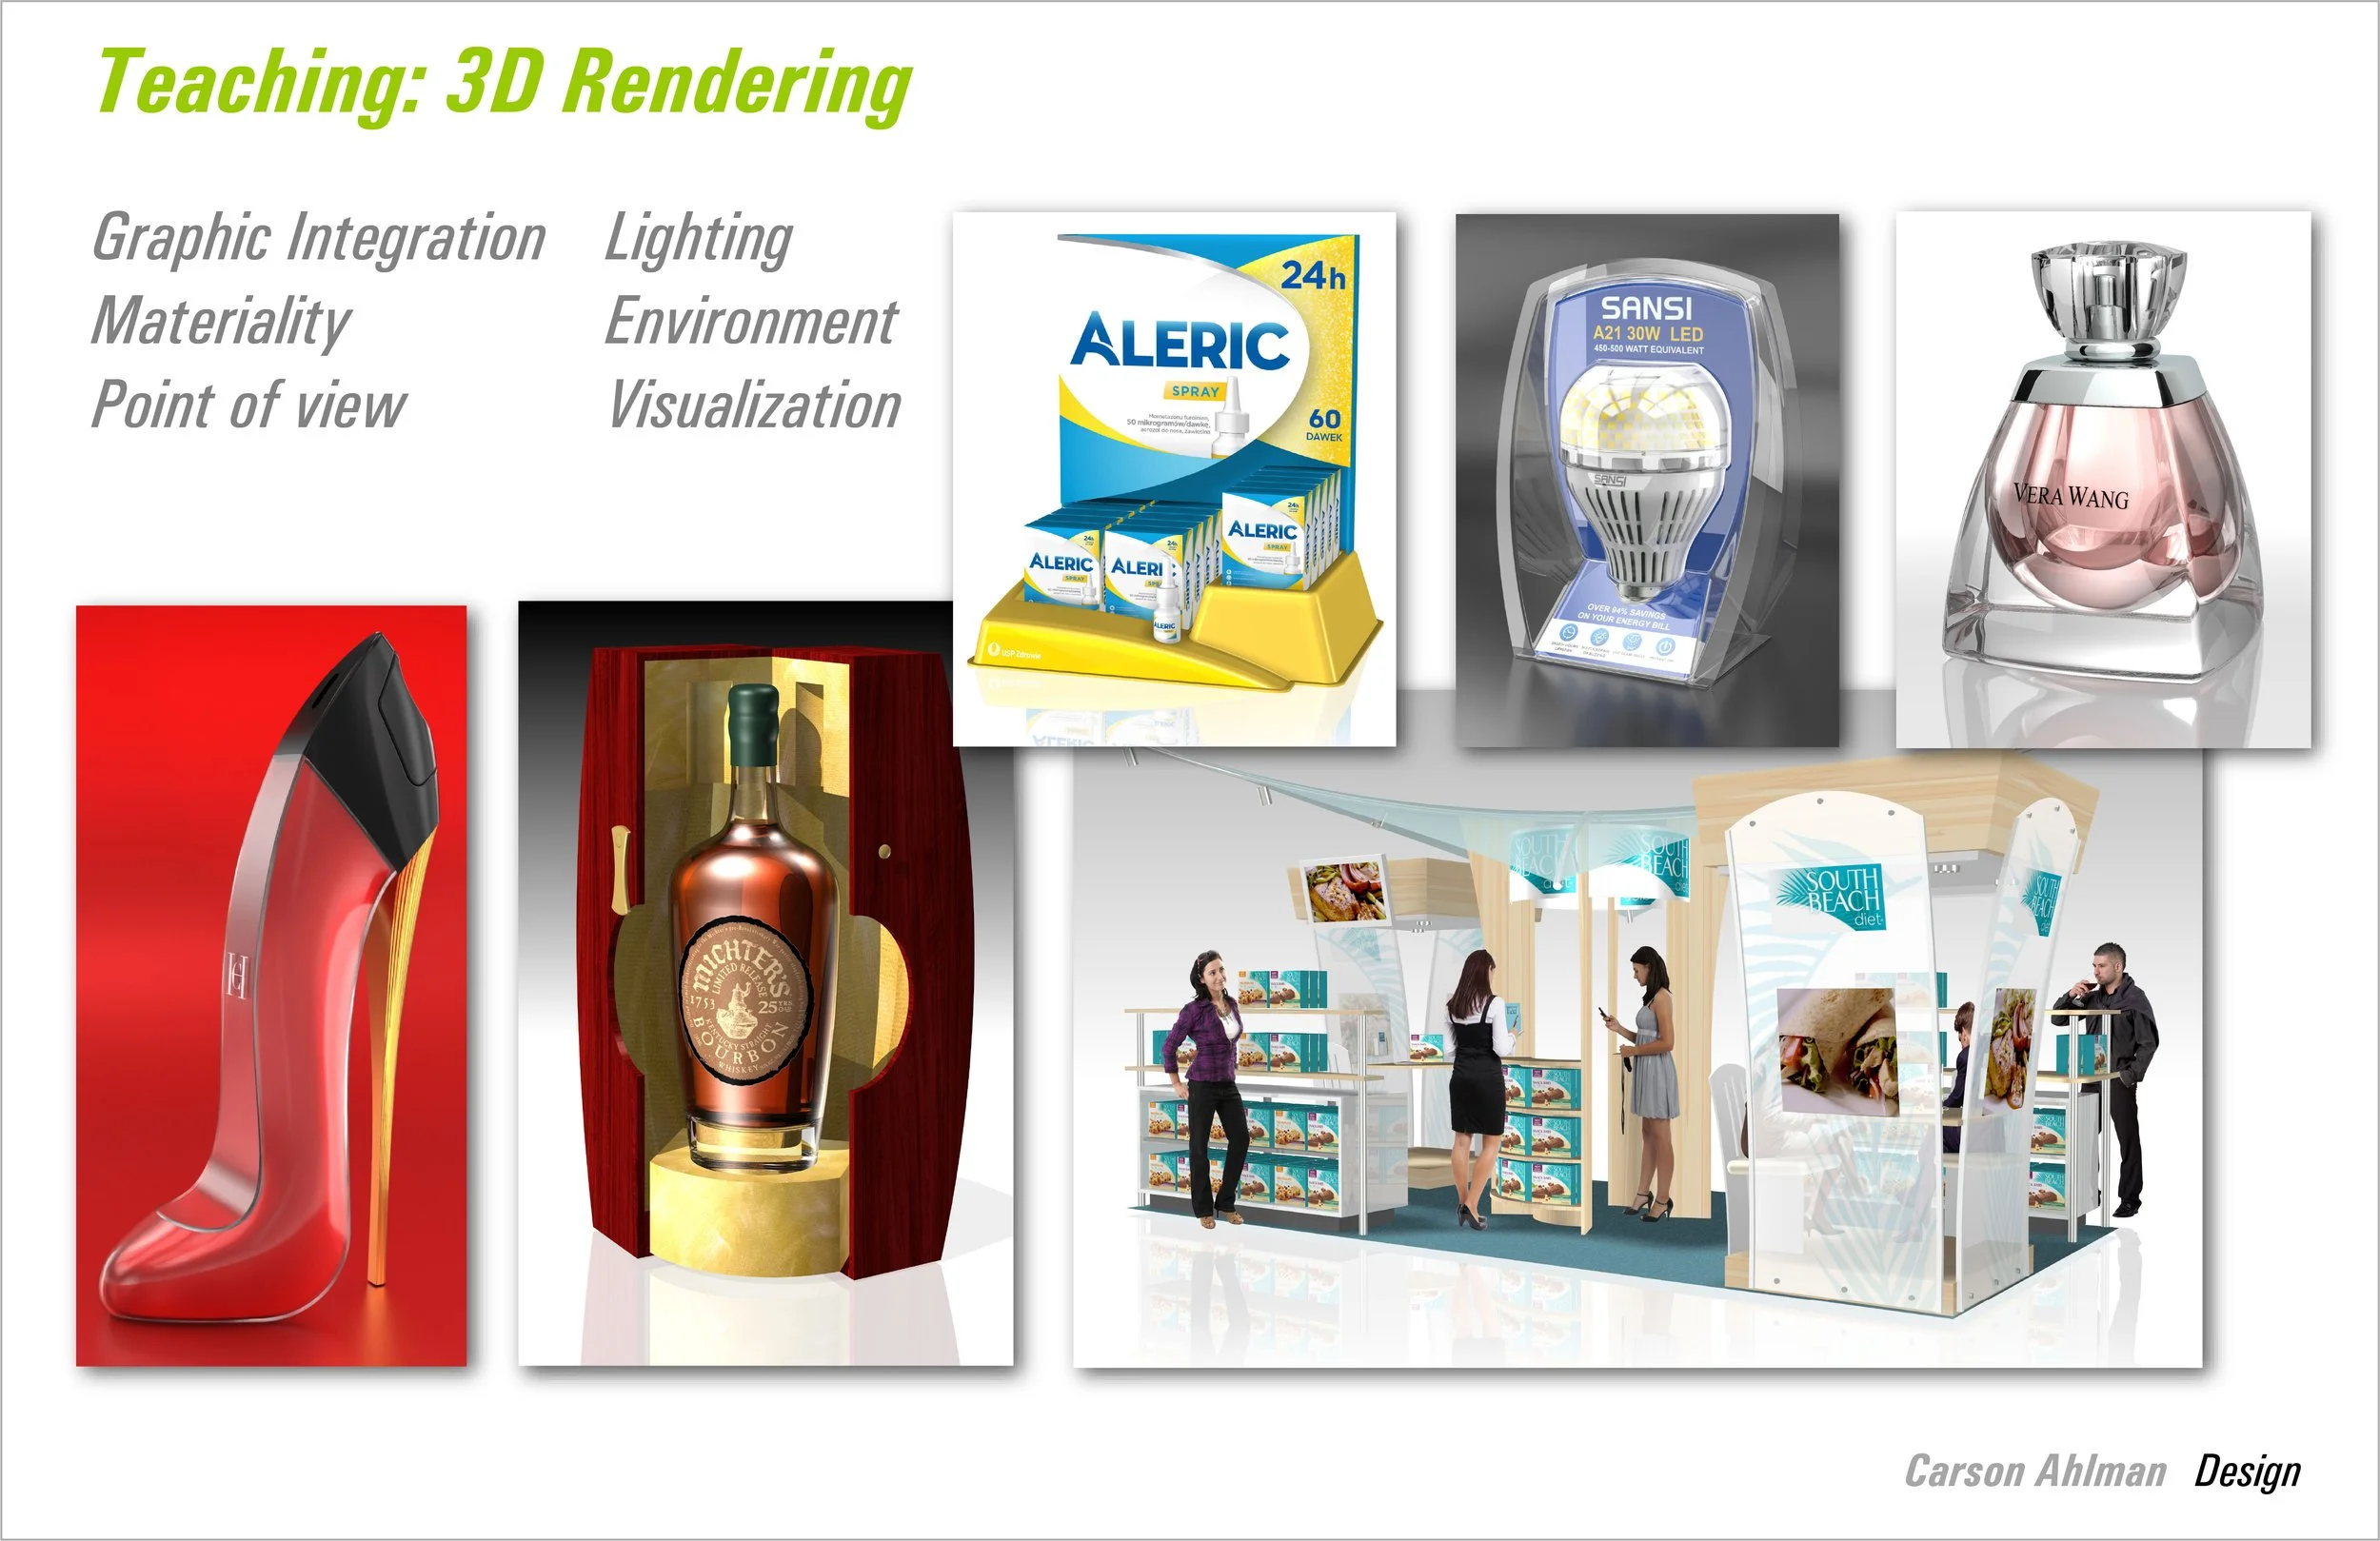
Utilizing rendering software, students produce photorealistic or conceptual images of their designs. This step helps communicate ideas effectively and explore surface qualities, textures, and lighting.
5. Creating Construction and Specification Drawings
Accurate technical drawings, including sections, elevations, and details, are generated from the 3D models, ensuring clarity for fabrication and assembly.
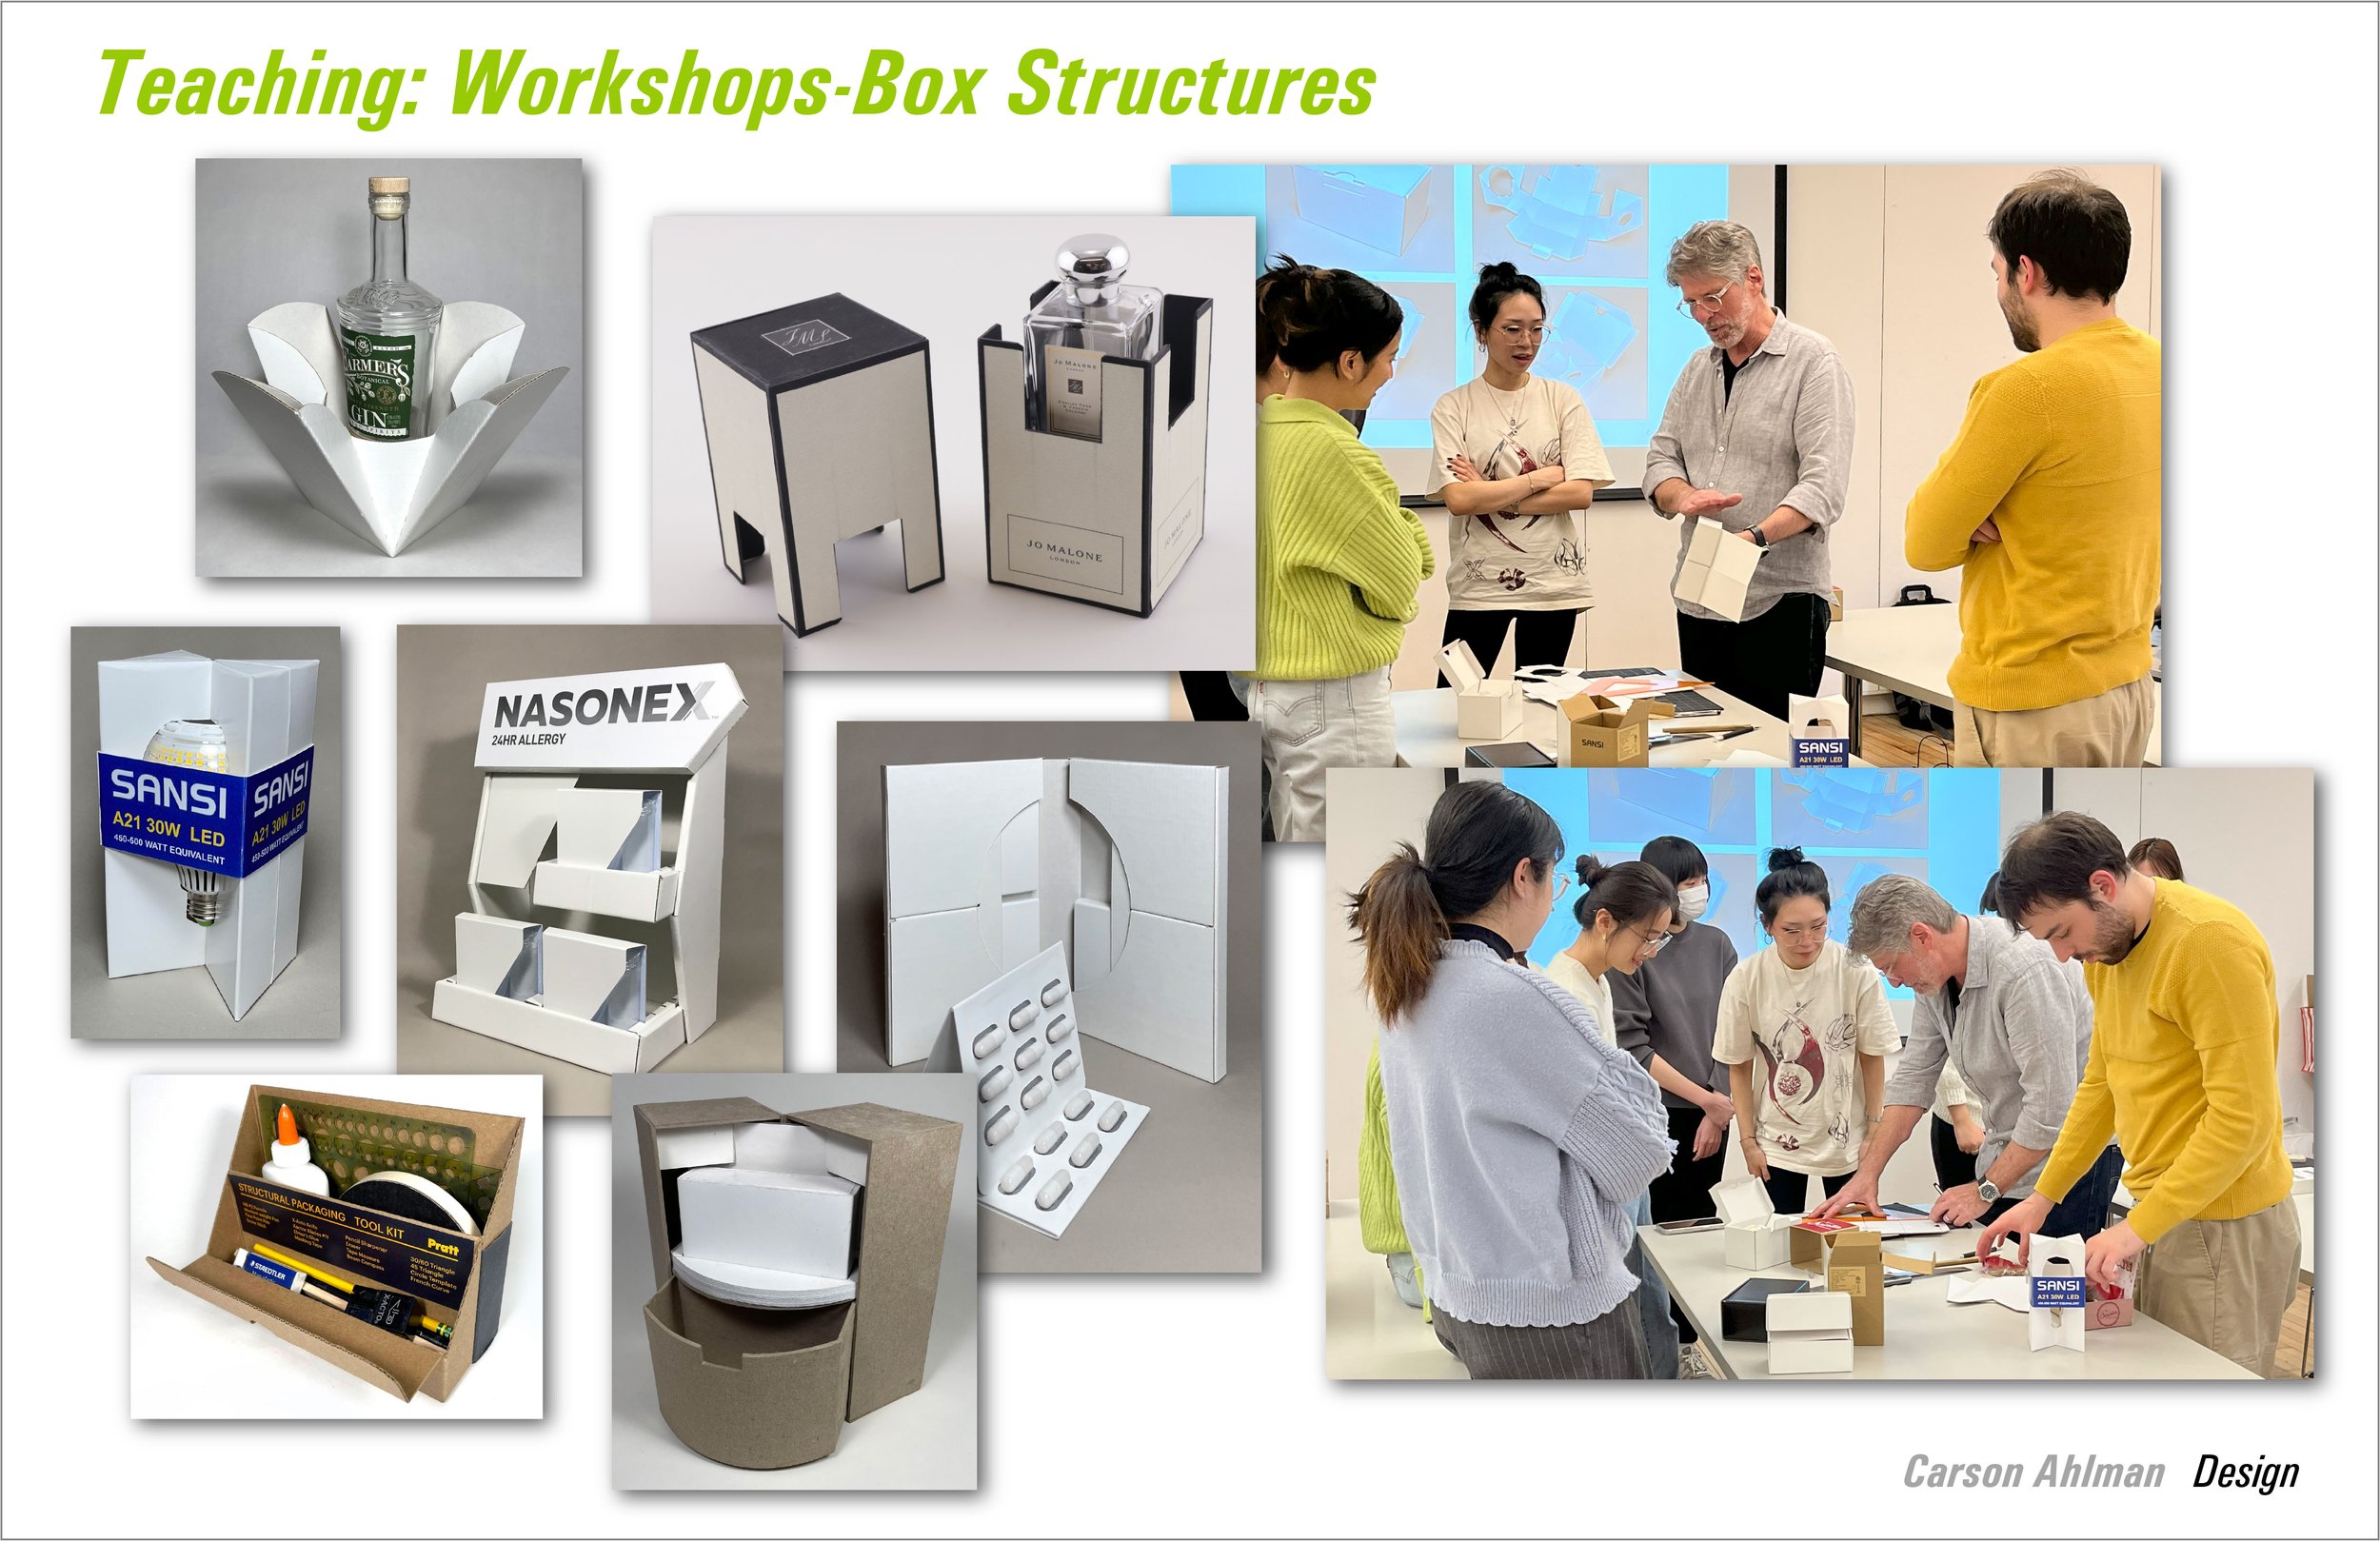
Teaching the Use of Mock-Ups in the Design Process
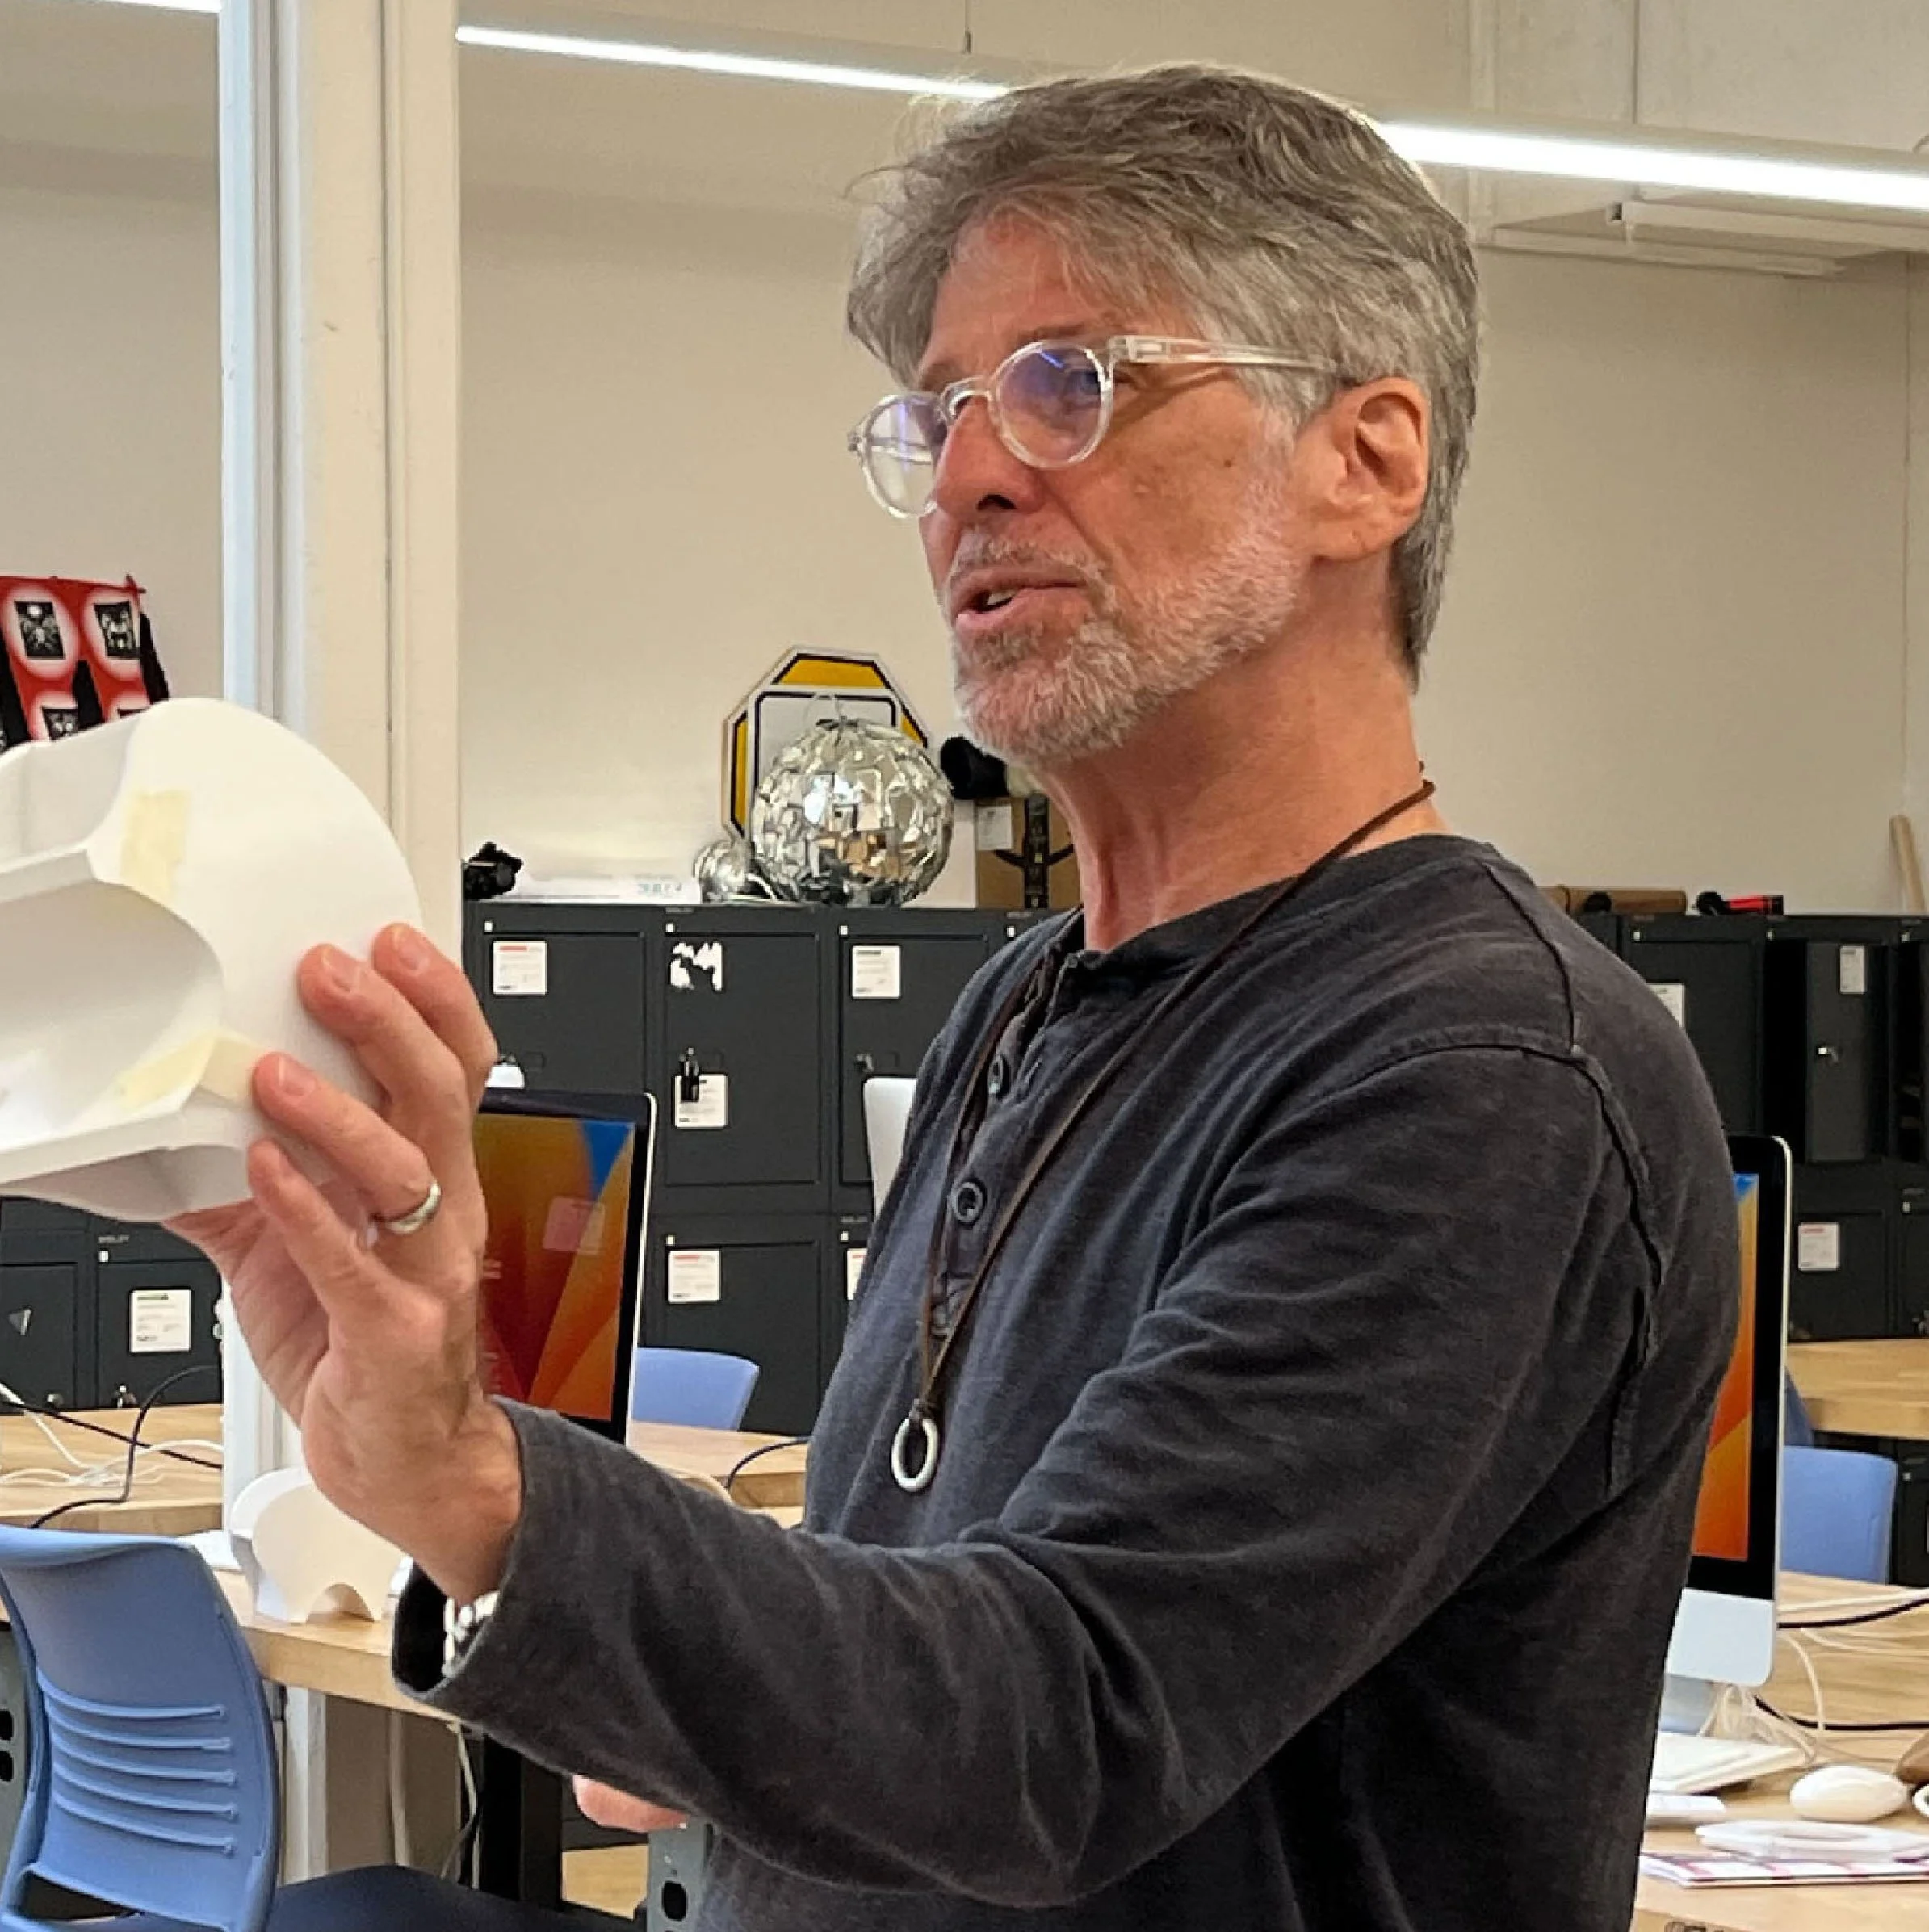
In my teaching, I emphasize the critical role of mock-ups in the iterative design process. Students are guided to explore and communicate their ideas through the creation of mock-ups using a wide range of materials and techniques. I encourage an experimental approach, where learners develop an understanding of form, function, and user interaction by physically and digitally prototyping their concepts.
Students begin with handmade techniques, such as sketch modelling with paper, cardboard, foam, wire, or found objects, which allow for quick iteration and tactile exploration. These methods foster a deep, intuitive understanding of scale, proportion, and spatial relationships. I integrate sessions focused on material experimentation, encouraging students to understand the properties, limitations, and expressive potential of each medium.
As projects progress, I introduce digital tools—such as CAD software, 3D modelling programs, or digital fabrication methods (e.g., laser cutting, 3D printing)—to refine mock-ups with precision and professionalism. I highlight the importance of aligning handmade and digital workflows, so students learn how to move seamlessly between physical and digital formats to evaluate and evolve their ideas.
Throughout, I stress the importance of mock-ups not only as developmental tools but also as communication devices. Whether rough or refined, each mock-up serves as a conversation point for feedback, testing, and iteration, reinforcing the value of prototyping in the design thinking process.
Teaching the Understanding of Production and Its Impact on the Design Process
In my teaching, I emphasize the intrinsic relationship between production methods and the design process. I guide students to see production not as a separate or final step, but as an integral factor that informs and shapes design decisions from the very beginning. This understanding fosters a more holistic approach to design—where creativity is grounded in practicality and innovation aligns with feasibility.
I start by exposing students to a range of production techniques—digital fabrication, traditional manufacturing, prototyping methods, and material constraints—highlighting how each impacts form, function, cost, and sustainability. Through case studies, hands-on projects, and collaboration with industry partners when possible, students explore how a design can be adapted or optimized for specific production methods.
I encourage critical thinking about scalability, user needs, and the lifecycle of a product, helping students anticipate the challenges and opportunities that production realities present. By integrating this mindset early in the design process, students learn to iterate with purpose, balancing aesthetics with structural integrity, budget, and manufacturability.
Ultimately, my goal is to equip students with the skills to make informed design choices that are both visionary and executable, fostering designers who can confidently move from concept to production with a clear understanding of the implications at every stage.
1. Curriculum Integration
Sustainable Design Principles: Introduce life-cycle thinking, circular economy, eco-design, and cradle-to-cradle principles in your coursework.
Case Studies: Analyze real-world projects that exemplify sustainable design solutions, such as zero-waste fashion, green architecture, or socially responsible product design.
2. Project-Based Learning
Assign projects that address sustainability challenges—e.g., designing products from recycled materials, reimagining packaging to reduce waste, or creating community-based design interventions.
3. Material and Resource Awareness
Promote the use of sustainable materials and low-impact production methods.
4. Systems Thinking
Teach students to view design problems within broader systems (social, economic, environmental).
5. Ethical and Social Responsibility
Encourage inclusive, human-centered, and culturally aware design practices.
6. Industry and Community Engagement
Partner with organizations that champion sustainability for internships, guest lectures, or collaborative projects.
7. Reflective Practice
Include reflection as a formal part of the design process, prompting students to consider the sustainability implications of their work.
Project Structure for Teaching Design Through Material and Process, and Narrative
I organize design assignments to guide students in exploring the intersection of materiality, fabrication, and storytelling. Each project is structured around three core components:
Material and Process Focus
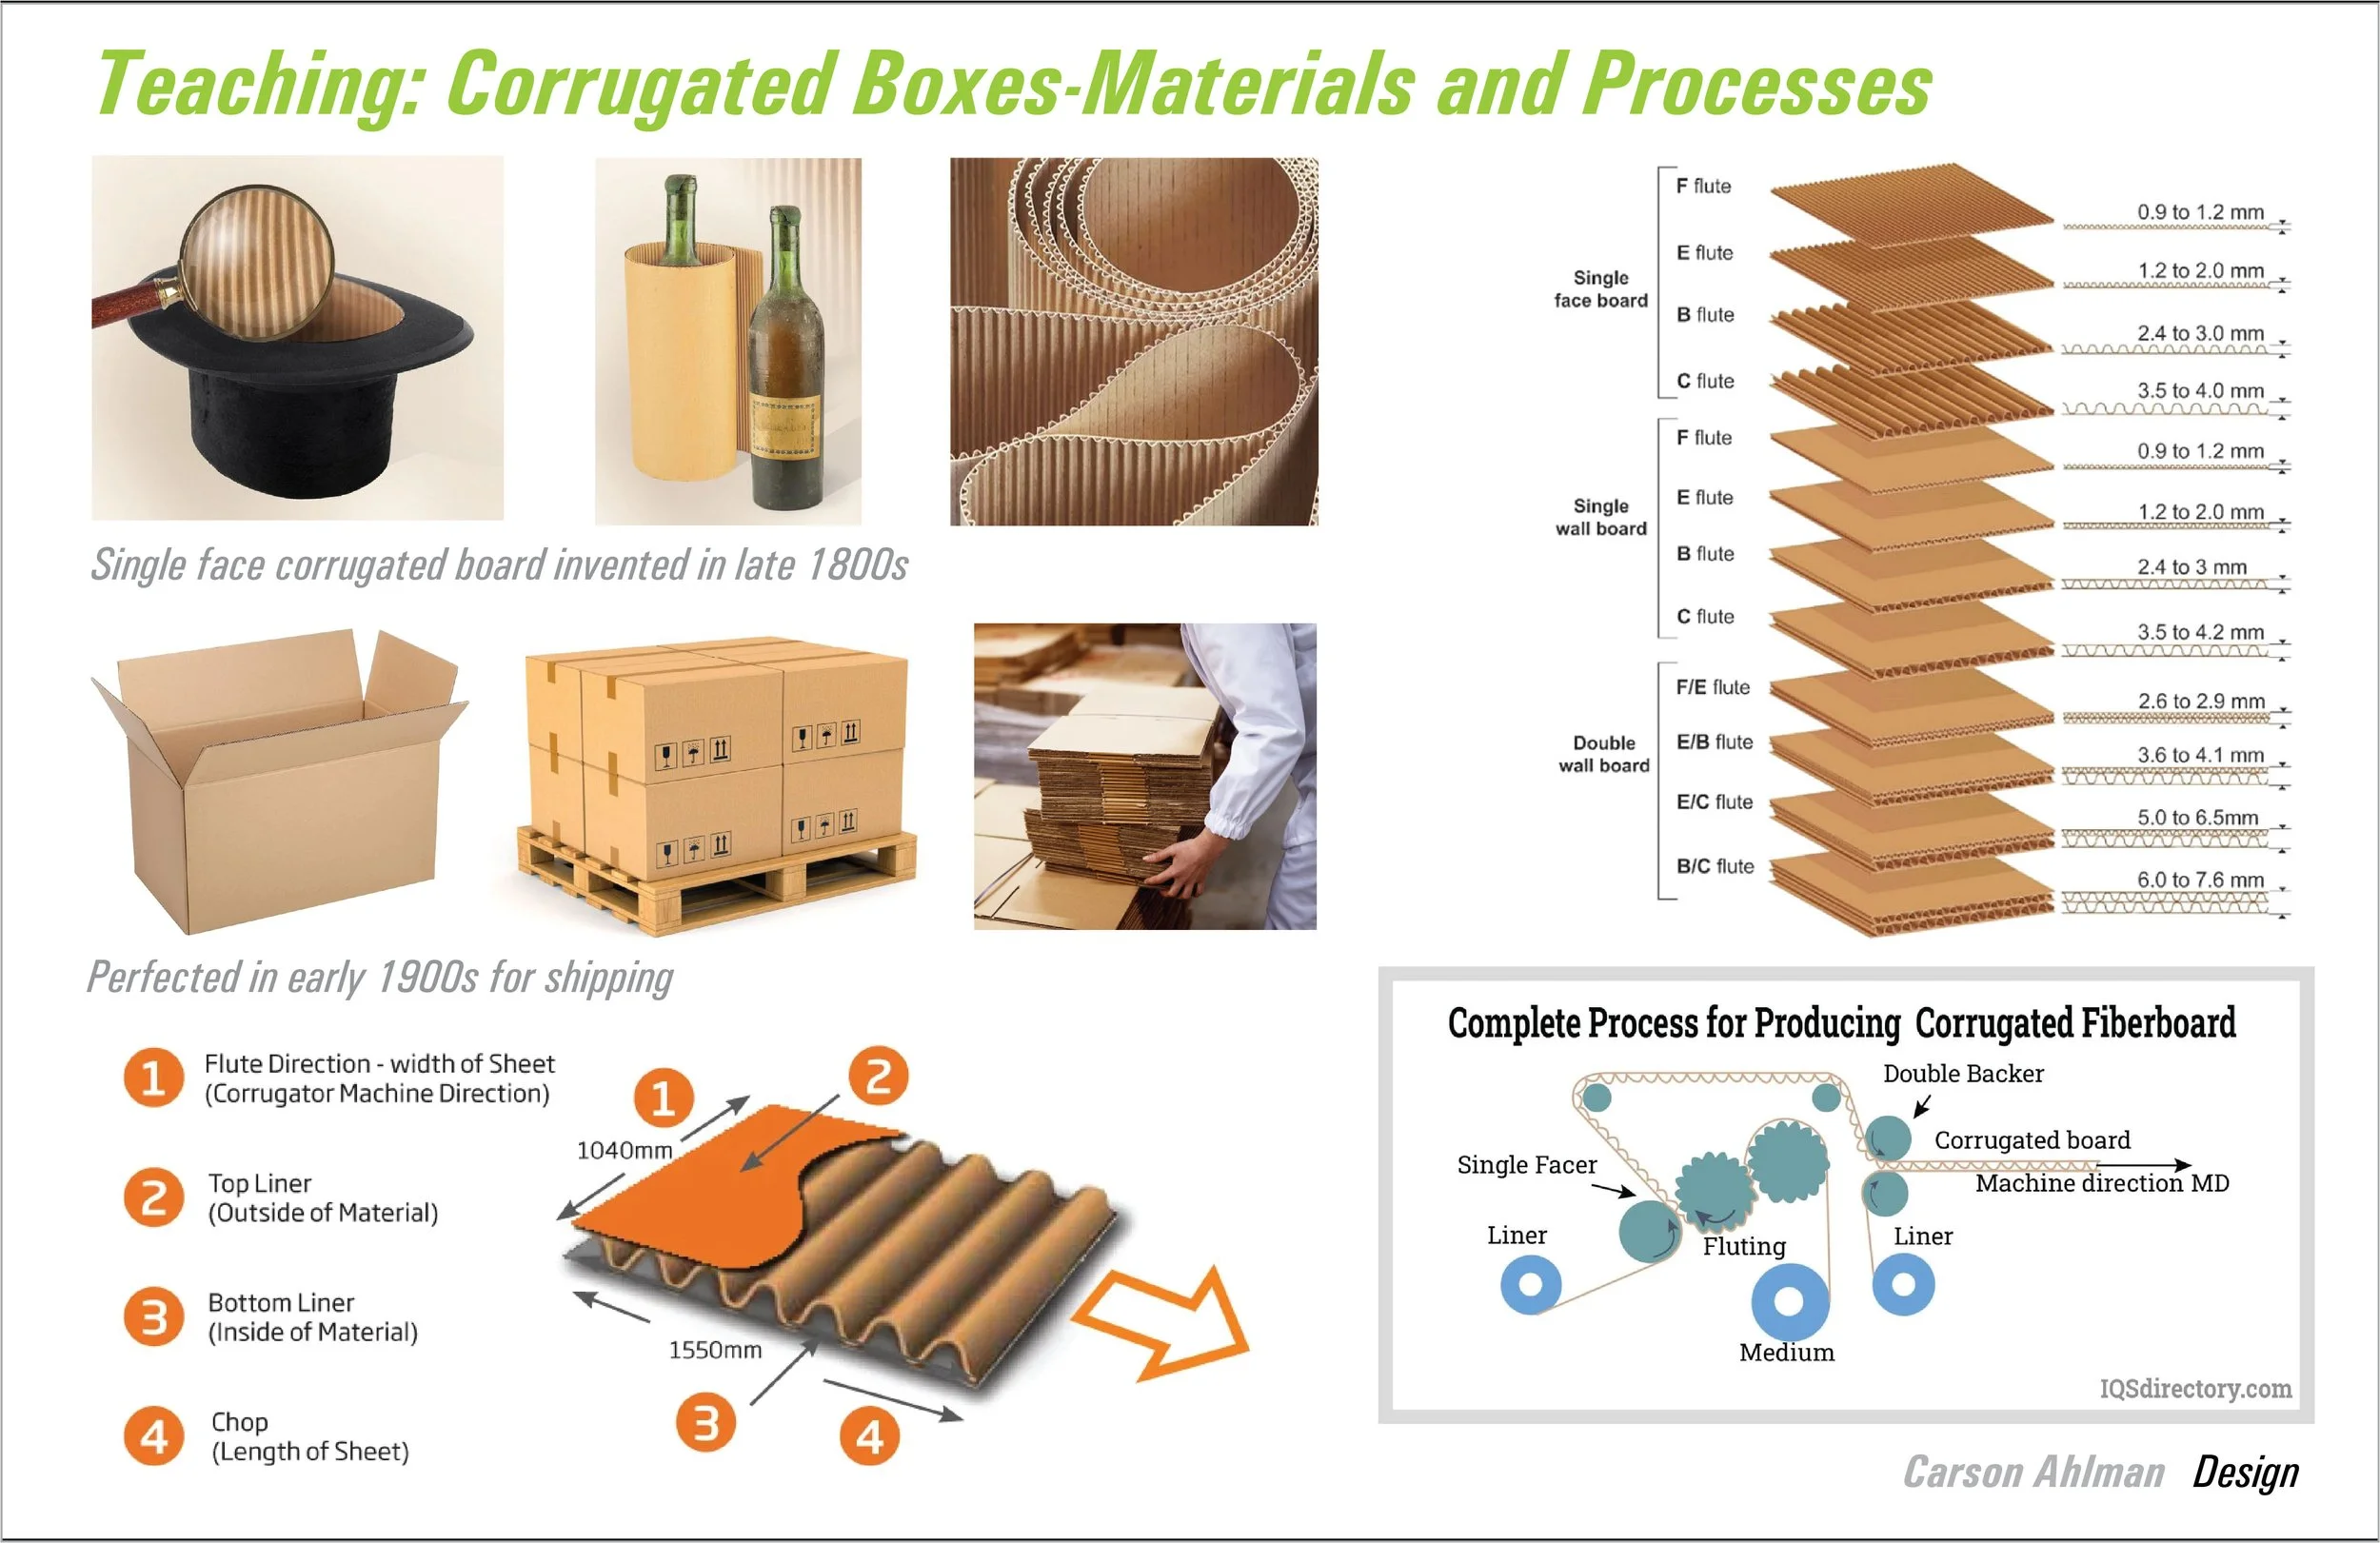
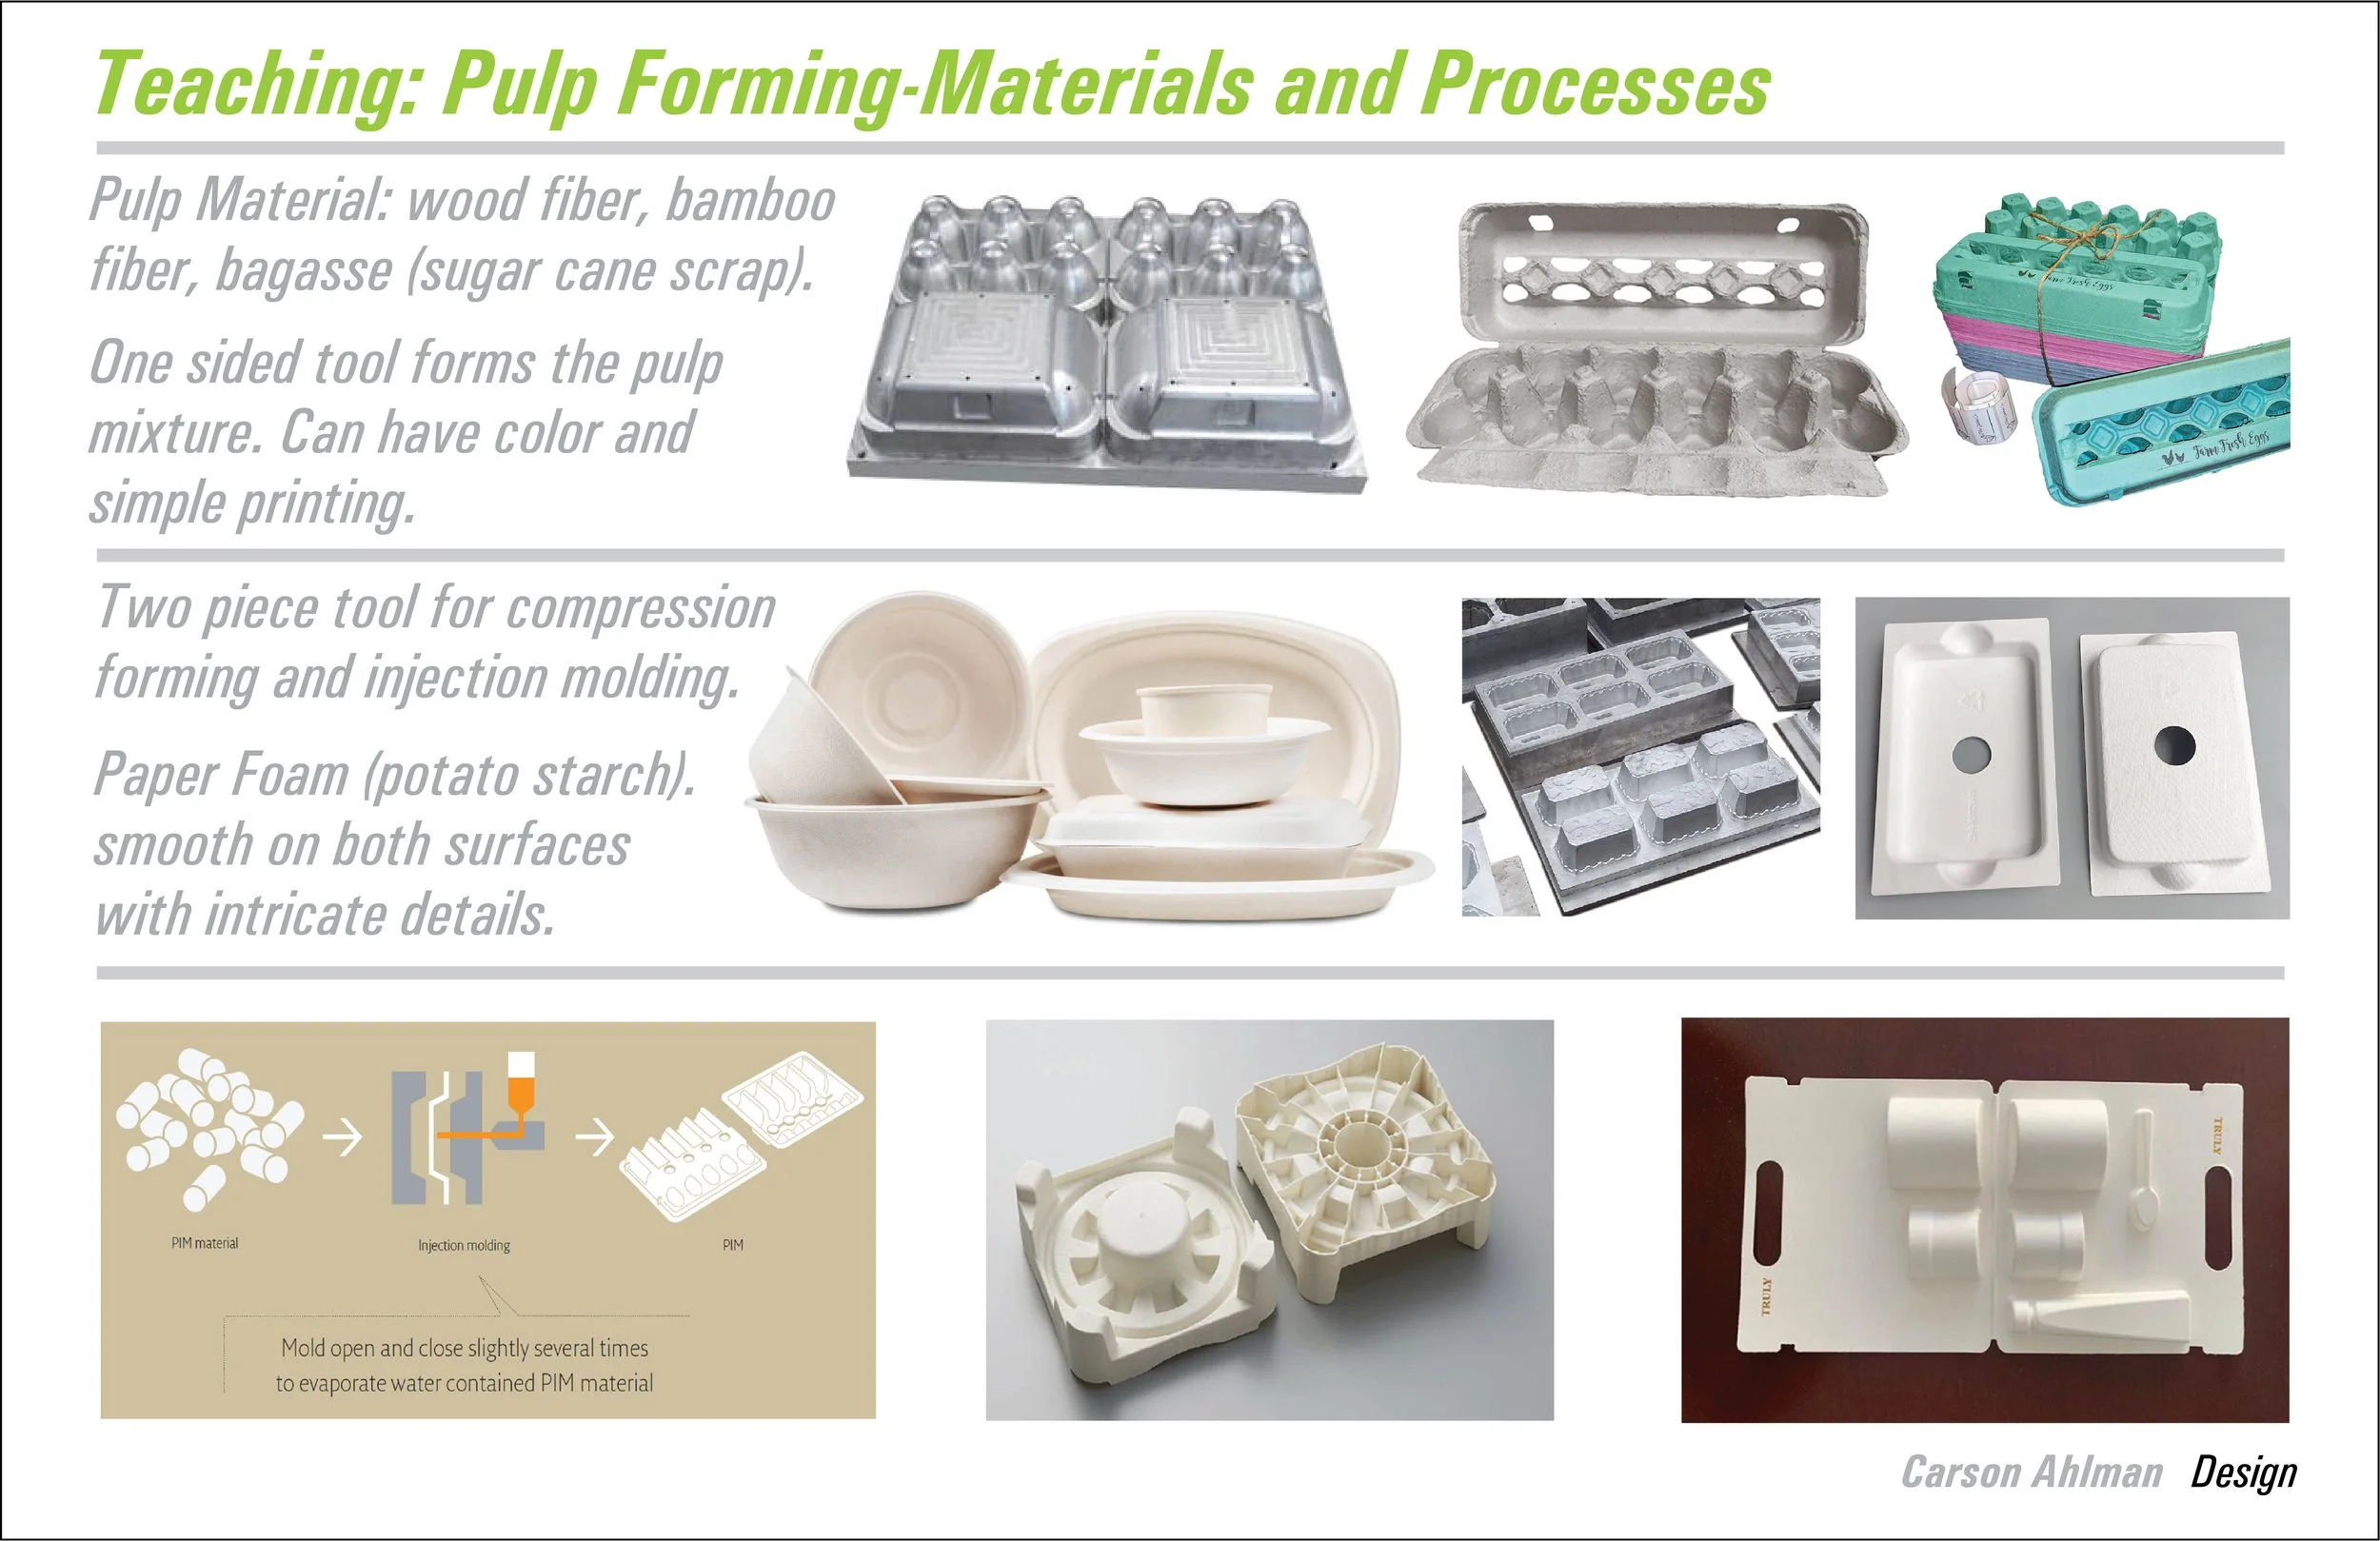
Each assignment begins with a defined material (e.g., cardboard, corrugated board, rigid board, plastic, glass) and an associated process or set of techniques (e.g., die cutting, folding, blow molding, vacuum forming, 3D printing, laser cutting). The intent is to immerse students in the affordances and limitations of the material, prompting hands-on experimentation and technical fluency.
Narrative Integration
While the material and process are fixed, the narrative is student-driven. Students are encouraged to develop a personal or contextual narrative—ranging from autobiographical themes to cultural, speculative, or conceptual frameworks. This narrative becomes the lens through which they explore form, function, and expression.
Applied Synthesis
The final deliverable requires students to synthesize material exploration and narrative into a coherent design artifact or system. This encourages critical thinking about how stories are embedded in material choices, fabrication methods, and user interactions.
Outcome
This structure fosters creativity within constraints. By anchoring projects in real materials and processes while allowing freedom in narrative, students learn to navigate the practicalities of making while developing a strong conceptual voice. They gain both technical competence and the ability to communicate meaning through design.
I use mentoring as a core method to teach design, combining structured learning with personalized guidance. My approach spans three key formats—workshops, YouTube tutorials, and one-on-one teaching—each tailored to support different learning styles and levels of experience.
Workshops: In group workshop settings, I create immersive, hands-on experiences where participants learn design principles through real-world projects and collaborative critique. I guide discussions that encourage exploration, experimentation, and peer learning, fostering both skill development and creative confidence.
YouTube Tutorials: My YouTube channel serves as an accessible platform for learners worldwide. I break down complex design topics into clear, engaging tutorials, sharing not just the "how," but also the "why" behind design decisions. These videos are crafted to support self-paced learning, and I often incorporate viewer feedback to refine future content.
One-on-One Teaching: In individual sessions, I tailor mentoring to each learner’s goals, whether they're beginners building a foundation or professionals refining their craft. This personalized approach allows for deeper exploration of design theory, critique of work in progress, and career guidance—helping mentees grow with clarity and purpose.
Through these formats, my mentoring aims to not only teach design skills but to instill a mindset of curiosity, critical thinking, and lifelong learning.
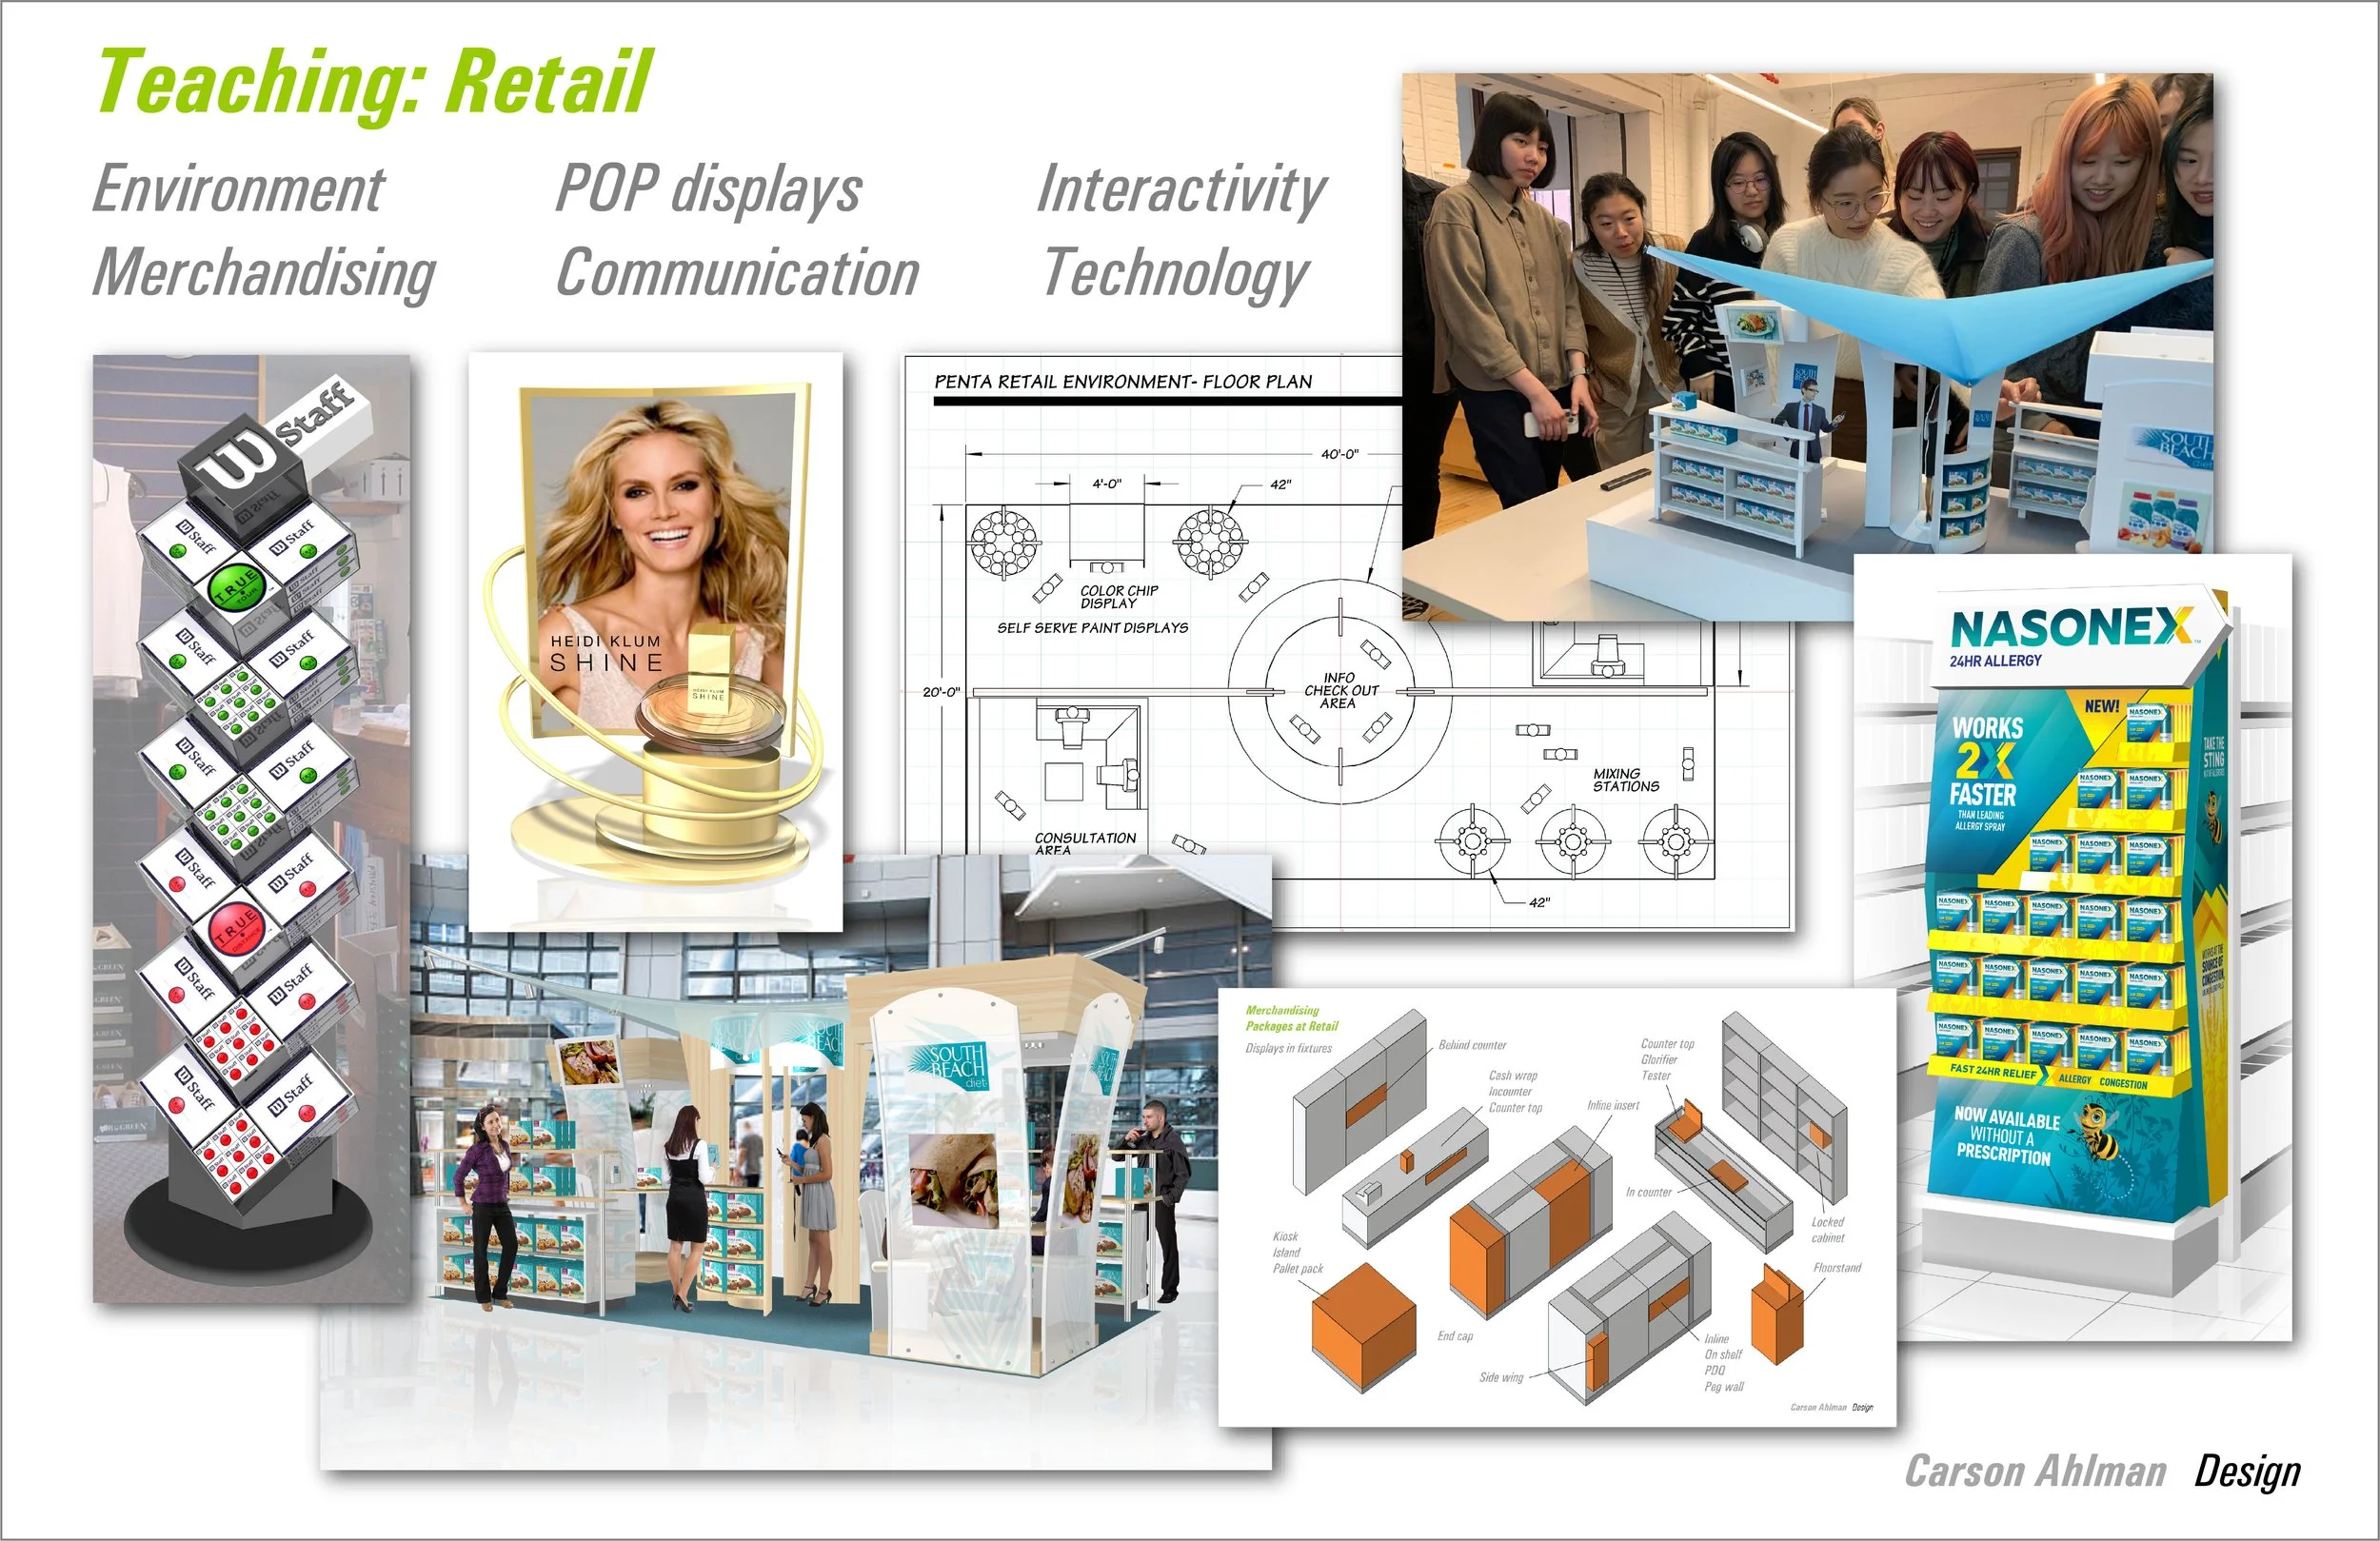
Integrating presentation techniques into teaching design enhances student engagement and comprehension. Students in my class present their assignments and progress in every class.
This encourages the students to use time management skills to stay on schedule and gives them the opportunity to practice presenting. Talking about their work and sharing their progress with the class creates community and allows the students to learn from one another. The following presentation techniques are used for effective communication.
Use Visual Aids: Incorporate slides, infographics, videos, mock-ups and diagrams to clarify complex concepts and maintain the audience’s attention.
Vary Delivery Style: Combine storytelling, demonstrations, and multimedia to cater to diverse audiences.
Implement Clear Structure: Organize content logically with an introduction, main points, and conclusion—using headings and summaries to guide understanding.
Practice Effective Communication: Use a confident tone, appropriate pacing, and eye contact to build rapport and credibility.
Use Technology Thoughtfully: Leverage presentation software features such as animations, transitions, and embedded multimedia to enhance clarity without distraction.
Provide Opportunities for Reflection: Pause for questions or short activities, encouraging audiences to process and understand information.
Incorporating presentation techniques into my teaching creates a dynamic learning environment, empowering students to effectively share their knowledge and ideas, which aligns with principles of experiential and student-centered learning design.